I was cleaning out some junk from my parents and found an unused electronic personal safe. They had bought it from Canadian Tire and ended up not using it. While testing it, I ended up locking it accidentally and realized I was missing the backup key to open it. The lock is hidden under a removable front panel. A quick google search found some youtube videos of how to open similar safes without the need of the code or the key by just pounding on the top while turning the knob. Remarkably, this actually worked. Google’s predictive search also led me to the search term “garrison safe recall” which led me to the recall notice here. It is illegal in Canada to sell or give away recalled items. Strangely, this item is still available on Canadian Tire’s website (maybe the problem has been fixed?). I took it back and got a full cash refund on the non-sale price.
Category Archives: Home
Unclog a Toilet with a Toothbrush Dropped Inside
My mom called me since their toilet was clogged with a dropped toothbrush. I used a snake and got it to flush but it clogged again since the toothbrush was probably still inside.
If you look at a diagram of a toilet, the toothbrush is probably lodged at the U turn at the top of the trap since it can’t get past it. Liquids will be fine but solids will get trapped.
Searching online, some solutions include removing the toilet, draining the trap and fishing the toothbrush out or melting it with a hot piece of wire. One unusual suggestion was to attach a balloon to a plastic pipe and inflating it. This seemed viable and a lot less work so I tried it. I was a little skeptical since I didn’t think the balloon would be strong enough.
I had some plastic supply line pipe used for sinks and put a balloon at the end and secured it with some duct tape. The pipe didn’t seem long enough so I extended it with another pipe and some more duct tape.
I assumed I needed to get the balloon past the U-turn and toothbrush so I cleared the drain a second time with the snake so that it could flush. I couldn’t get the balloon down the drain as far as I wanted but decide to inflate the balloon anyway and gave it a pull. This worked and the toothbrush dropped down. It seems you only need a little friction against the toothbrush to dislodge it so you only need to push the balloon as far as it can go.
Touch Dimmer for Table Lamps
My table lamps were over 20 years old, dated and the shades had faded and the plastic was disintegrating. I looked for replacements awhile ago but was looking for something with a tri-light switch since it is nice to be set them at different brightness levels. Tri-light incandescant bulbs don’t seem to last and are also available in CFL versions.
I found some more modern lamps at the Target liquidation sale and snapped them up even though they weren’t tri-lights. I got LED bulbs for them since they tend to be on all evening. I was going to get a slide dimmer but end up finding touch operated dimmers that operate with metal lamps. I found these at Princess Auto though Canadian Tire has them as well for quite a bit more.
Squeaky floors Squeeeeek-No-More Review
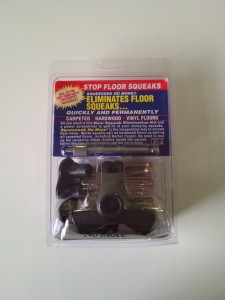
Floors squeak due to floor boards that are nailed to joists becoming loose over time. Newer construction techniques use glue and screws to minimize squeaking. After watching “Ask This Old House”, they featured a repair system with a depth guide and screws with break-away heads called “Squeeeeek-No-More”. I picked this product up in Home Depot in the US for $20 in the carpet section of the store.
The hardest part of the repair is finding the joists. The instruction manual suggests going 9″ over from a wall and assume that joists typically run in the direction of the shorter length of a rectangular floor plan on 16″ centers. The kit includes a special screw with a hex head and long straight shank to help locate joists.
My subfloor is constructed with diagonal 1″x 6″? boards with plywood on top (original wood floors removed) and then underlayment and pile carpet.
I found it pretty hard to find the joists and initially the joist was running the opposite angle I had assumed. Even after locating the joist (the screw will stop spinning), the squeaks were improved but not eliminated. I found with pile carpet, I could use trimhead 3″ screws instead of the Squeeeeek-No-More screws.
I will be returning the system and have given up on fixing the squeaks until I replace the carpet.
Switch Guards for Motion Sensor Lights
I switched all my outdoor lights to motion sensor activated ones for convenience, security, and to chase away animals. One problem is that they get accidentally turned off which defeats the whole purpose of having motion lights. The solution is to use switch guards which I’ve only been able to find in the US including Home Depot. They cover the toggle switch and minimize the chance of the switch being turned off but still allow access from one side.
Toilet Handle Lever Repair
The toilet tank lever broke and I figured it would be an easy repair. It is just a nut holding the handle in place but I had trouble unscrewing it out. Giving up temporarily, I headed to Home Depot anyway to get a universal replacement. They come in different lengths so measure or bring your old lever to compare. Back to removing the old handle, I ended up breaking the handle off and using a hacksaw to cut it off. With the replacement handle, again I had trouble removing the nut and after checking the instructions, it indicated to turn the nut counter-clockwise to tighten. It is reverse threaded to prevent it from loosening when flushing the handle. The flapper chain was attached to the old handle with some wire that I had to cut and then I temporarily used a paper clip to attach it to the new handle. This will eventually rust so I’ll need to go back to Home Depot to grab a proper retaining clip. Though it seemed basic, a quick google search would have saved me a bit of time and frustration.
Costco Pharmacy – Lowest Price for Prescription Drugs – No Membership Required
I had let my Costco membership lapse and had to get my regular prescription drugs filled elsewhere. I got it filled at Real Canadian Superstore and the cost was significantly more than I was paying at Costco. I considered renewing my Costco membership just so I could save on my drugs. I then found out that a membership is NOT required to use the pharmacy at Costco. Pharmacy laws protect against discrimination. Costco’s dispensing fee is $4.49 currently and drug prices are also lower, especially generics.
To get by the employee at the entrance, just say you are going to the pharmacy. They will also ask for your membership card when paying but it’s ok to say you don’t have one. Recently, Canadian Costco’s switched to Mastercard from American Express so you can pay by credit card instead of debit.
Update
Here is another tip to save time. You can fax in your prescriptions and you don’t need a fax machine. Get the pharmacy’s fax number. Scan your prescription or take a picture with your smartphone. I use faxzero.com to send it. Costco will send you a text when it is ready to pick up and you will need to bring your original prescription in.
Repairing Leaning Fence Posts
One side of my fence has been deteriorating for years and leaning towards my side of the property. When I was out of the country, my friend came over and propped them up with some 2×4’s to keep it from falling. The posts appear to be set in dirt and not concrete so the proper repair is to replace them which would require rebuilding the entire fence. You can actually pour the cement mix dry and water it after which makes it a bit easier.
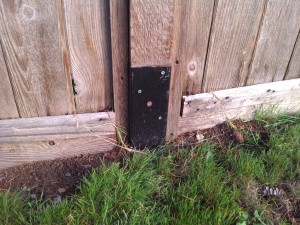
I came across the Simpson Fence Mender at Home Depot in the joist hangers section. I bought one to try it out since they were relatively inexpensive. The instruction indicate it should be installed in pairs but I figure a single one should improve the post.
The instructions indicated you should hammer on the indentation to drive it down but it is kind of hard to hit it with a mallet. I just used a scrap piece of wood and pounded it from the top keeping it as close to the post as possible.
It actually worked pretty good and it was secure enough to remove the bracing and I bought a second one for the neigbouring post.
Hot Water Tank Replacement
Hot water tanks eventually rust out and will start leaking after many years. My first replacement leaked right after the warranty expired and for my second replacement, I purchased one with the longest warranty available (12 years). I was out of town when it was replaced, and my friend got several quotes and found Home Depot was the lowest for the tank and installation. Since I don’t have a drain in the basement, I should have gotten a drain pan installed underneath the tank as well.
To be alerted next time the tank fails, I installed a flood sensor but ran it from an AC adapter instead of batteries. I worried about batteries dying being left in the alarm for years. There are single use detectors available as well. When I installed my monitored alarm, I also added a second flood detector which required a separate 470pb probe.
You can replace the anode in a hot water tank to extends its life. I think once my second tank goes, I will switch to a tankless heater.
Laminate Floor Installation
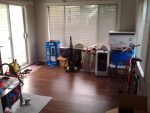
Browsing Home Depot, I found some 12mm laminate flooring for $1/sq ft. This was a good deal since thick flooring is better and usually more expensive. Though my upstairs needs new flooring, I didn’t want a patchwork of different flooring styles but will probably stick with carpet in the living areas and use plank vinyl in the bathroom and kitchen. The upstairs addition is carpeted and gets dirty from the sliding door entry and I’ve also used the room as a work space. I bought enough laminate to cover the addition, the foyer and stairs.
In the addition, I considered leaving the baseboards up but the correct thing to do was to remove and reinstall them. At my parents, “professional” installers left the baseboards and then added quarter round moulding to cover the gap leaving a less finished look.
I borrowed a portable table saw, a chop saw and a laminate cutter. The cutter was probably meant for thinner laminate since the cuts weren’t very clean with 12mm laminate so I didn’t use it. When sawing, the good side should be UP when using the table saw or chop saw to minimize chipping the surface.
Next I had to decide if I wanted to use underlay. Since I was installing on plywood, it wasn’t really necessary but would give the floors a softer feel. I picked some up at Rona.
With the carpet up, I notice quite a draft coming from one outside wall by the floor. I noticed the entire wall had been shimmed up about 1/4″ causing a major draft. I didn’t have any expanding foam insulation so just used a large amount of caulk to try to seal the air leakage.
Back to the flooring. For the first row, the tongue on the plank needs to be ripped off. The thickness of the last row also needs to be estimated at this time since you don’t want a 1″ sliver on your last row. A gap needs to be maintained on the edges to allow for expansion which would be covered by the baseboard.
The instructions indicate joints must be more than 6″ apart so the trick is to stagger the rows while minimizing waste. I’ve seen installations where the joints on every other row line up and it doesn’t look very natural so I wanted a fairly random stagger pattern.
For the last row, you should measure the thickness at both ends of the plank since the area may not be perfectly square. I had to redo one plank because of this problem.
Also, I needed to cut around a door jamb to slide the laminate underneath. A borrowed oscillating saw was the perfect tool to make the cut.
With the floor installed, I replaced the molding and caulked the gaps but didn’t realize I had accidentally purchased clear caulk instead of white since it only dries clear. Just a minor mistake.
In the entryway, I first removed the existing tile which had been laid on the original vinyl floor. I contemplated ripping up the vinyl but decided against it. In the entry way, you do have to worry about the laminate getting wet since water could damage it so I had some tile carpet that I used to rest shoes on.
For the stairs, hardwood nosing would cost about $10 a step while the whole step could be replaced for $30 so I decided against using laminate on the steps. Replacing the steps will be another future project.


