All posts by admin

Wireless File Transfer with Asus File Manager

When transferring pics from my tablet to my PC, I normally just attach it to an email and retrieve it from the drafts folder on my PC.  I had a bunch of photos this time and decided to use USB but when I plugged in my tablet, I got a notification to use wireless transfer.

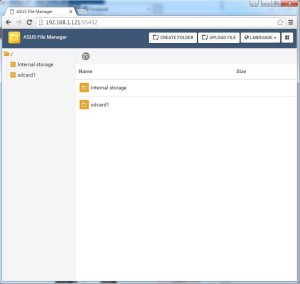
You need Asus File Manager which is available for everyone at the Google Play Store.  There is no built in file manager app in Android.  To start it, run File Manager on your tablet and scroll until you find PC File Transfer on the bottom.  Start the service and it gives you a web address to access your tablet’s file system from a browser. Internet Explorer was not supported so I had to use Chrome.

The files are in a weird  order and you can’t click on the Name or Date heading to re-sort it like in an Explorer window.

This does seem to be an easy way to transfer files though tricky to find your files without sort capability.

Update July 25 2016:  Internet Explorer seems supported now but clicking on a jpg will open the image in a new tab.  If you use Chrome, the image will be saved in your Downloads folder which seems easier if downloading a large number of files.


filemanager

Fence Repair

A recent windstorm had caused some damage to my back fence which required some repair.  I had reinforced some of the posts previously with the Fence Mender product  and had a spare I had planned to put in when the weather improved.  See previous post here.

Since the big box stores typically don’t carry cedar fencing materials, I headed out to my local lumber yard, Sunbury Cedar.  They carry short lengths of cedar wood (which are much cheaper than long pieces) and bulk exterior nails.  I would need 4′ 1×3’s to reinforce the panels and pressure-treated 2×4’s for the base.  I also needed to repair some lattice and they use that dimension of wood as scrap spacers in bundles.

My fence panels are relatively thin and stapled and nailed together.  A well constructed panel should used 2×4’s mounted vertically (to prevent sagging) for the top and bottom rails.  The bottom rail should be pressure-treated to prevent rot and insect damage.  You can use Simpson hangers to attach the rails if you are building a fence from  scratch.

My fence only had a 1×5 at the base which rotted from the neighbour piling dirt against it on the other side.

To reinforce the panels where they were weak, I used 1×3’s screwed with 1-1/2″ exterior brown screws on both the top and bottom parts of the panel.  I made sure the bottom pieces were level.

To repair the rotted bottoms,  I  pulled out any remaining wood at the bottom and borrowed an oscillating saw to even out the bottom of the fence boards and the edge of the panels where it connected to the post.  I could then fit a pressure treated 2×4 at the bottom.  Screwing from the panel into the top of the 2×4 first made fitting the piece a bit easier.

When working with pressure  treated lumber, you need to use green ACQ screws that prevent corrosion when in contact with the chemicals in the wood.  If you need to cut the ends, you need to recoat it with “End Cut” preservative.

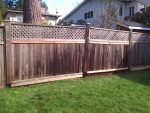
Here’s the almost finished job since I still need another Fence Mender on one remaining post and was short a 2×4 for one panel.


92-97 Volvo 850 Stuck Glove Box Repair

My dad called me since the glove box on their Volvo was stuck.  He phoned the auto repair shop and they wanted $200 to repair it.

Searching the internet, the best site to fix this problem is here http://www.matthewsvolvosite.com/fix-a-stuck-glove-box-tutorial.html   I followed their procedure and found it was missing a few steps.

I drilled a very small hole following the instructions there and managed to open the glove box door after a few attempts.  You need to push into the hole and lift up to release the latch.  I used the end of a smaller drill bit.

Once opened, the glove box panel needs to be removed to work on it.  First remove the seven philips screws.  Removing the plastic supports on the sides first will make it easier.  From the back of that panel, insert a flat blade screwdriver into the slot where the support attaches and pry it to release the support.  I would also put some tape on the ends so they don’t fall back into the dashboard.  This did happen to me on one side so I had to remove the bottom panel held by three Torx T-25 screws to retrieve the support and push it back through the opening.

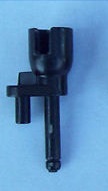
Once you have the door removed, you can see how it works.  Lifting the handle rotates the bar which connects to a piece with a nub that pushes the latch open.  This nub breaks off and can be replaced by drilling a hole and inserting a small machine screw.  The metal is soft enough that you don’t need to tap it.  You can also replace the whole piece by searching for the part on ebay.  I found a kit that included the latch hook and retaining clip.

To get at the assembly you will have to remove the three screws.  Before this step, make note of the spring that will pop out.  It pushes the door away from the latch once opened.

I didn’t need to disassemble the piece that broke off to drill a hole to insert a screw.  Just find a screw approximately the same diameter as the piece that broke off and use a drill bit slightly smaller.

I have a vinyl repair kit that I can use to fill in the hole I drilled to complete the repair.

Latch part


Weiser / Kwikset Smartkey Vulnerability

During my update of all my brass door hardware inside the house, I also updated my front door lock and deadbolt.  Since I wanted to use my existing Weiser keys, I purchased a Weiser front entry knob and deadbolt with their Smartkey system.  The Weiser brand is used in Canada while Kwikset is used in the US.

The first issue encountered was that the Weiser locks used thinner keys so my old keys could no longer be used.  However, the Smartkey was very easy rekey both locks to match my new keys.

Second issue was that when I went to Home Depot to get some more duplicate keys, they didn’t work.  Comparing the new and original keys, they did appear to match.  I ended up taking both the lock and keys back to Home Depot to get them re-cut and the new ones worked fine.

For the entry knob, my old lock had a push and turn system which made it very easy to both lock and unlock.  The new knob used a small round turn switch which was relatively more difficult to both lock and unlock.  The only advantage of this switch is the ability to lock the knob from the outside with the key.  In both designs, you can lock the door without a key (which is required with the deadbolt).

After my update, I did find out there are vulnerabilities with the Smartkey system.  They can be opened with a special tool fairly easily.  You can find articles and videos on youtube if you search.

I am not really concerned because if someone wanted to break into your house, they would get in and I also have my monitored alarm system.

Two Days in Los Angeles – No Car and No Cash

I was able to pickup a mistake fare on Delta for $65 CAD YVR-LAX return posted on the YVR deals facebook page and website.  With the low CAD and high cost of hotels, I would only stay for one night.  Since I am used to visit cities as cruise ports, I am used to exploring a city within six hours so two days is a relatively long time.

My plan was to NOT rent a vehicle in the sprawling LA area due to bad traffic and having to pay for parking but two things I wanted to do were to bike along Venice Beach and hike Runyun Canyon.  My other challenge was to NOT use cash and credit card only.  Having a vehicle might have added the Getty Center and Griffith Observatory to my itinerary.

I researched bus routes and how to use the LA metro network with the help of Google maps and streetview.  I planned to stay in the Hollywood area since it was central and  near metro stations though I had been warned that the area was dirty and had lots of homeless people.

The best hotel rate I could find in the area was the Motel 6 in Hollywood for $70/night midweek.  I found an online code that saved me 10%.  By the time I actually booked, the rate went up $5.  In hindsight, I should have booked earlier since I was only charged once I stayed.

LAX  by Public Transport

First challenge was to get from LAX to the hotel in Hollywood.  I had planned to head into Santa Monica right after but realized it would be more efficient to head into Santa Monica directly from LAX since it was closer.  I would just need to lug my small pack until I checked in.

Options for leaving LAX were a shuttle/metro ($1.75 + $1 for TAP card) or the LAX flyaway bus ($8-$9).  The most frequent route was to Union Station downtown (30 min) though there were routes to both Hollywood and Santa Monica for the same price.  I then found that Santa Monica’s bus network had a route from LAX to downtown Santa Monica for $1.25.  Since I could only purchase a TAP card at a kiosk at LAX/Aviation Station, I would take the free “G” shuttle there and could buy the card and stored value with my credit card.  If I paid cash, I could’ve paid the $1.25 fare and used the bus terminal from “C” lot but would still need to get a TAP card in Santa Monica to be able to transfer to get to Hollywood.

I was a bit confused about the TAP card with my research and unsure of the amounts that could be loaded onto it.  A daypass can be loaded for $7 (break even at 4 trips) and I didn’t need a daypass for the first day.  The preset stored value amounts are $1.75, $3.50, $5 and $10 and $20.  If you have both stored value and a pass loaded on your card, the pass will be used first and the daypass would be activated on first use so you can buy it the night before.  Daypasses and single fares could also be loaded on buses but cash only.

Arriving at LAX/Aviation station, I found a single kiosk at the west end of the station near the shuttle stop.  A line had formed behind me.  The bus for Santa Monica boarded on the east side and from there I noticed two more kiosks on that side.  When the Big Blue Bus arrived and I boarded, I couldn’t find where to tap on the farebox. The receiver  was actually mounted at the front of the bus by the steps.  Santa Monica buses had their own payment system and adding TAP was a retrofit.

On the trip there, we passed the In-n-Out Burger in Marina Del Rey I had planned to bike to.  I could’ve gotten off and save myself the extra bike trip.

Santa Monica Breeze Bikeshare

At Santa Monica, I was planning to use the new Breeze Bikeshare network.  In hindsight, I should have just used a regular rental shop since I could have left my bag there instead of lugging it with me.  The kiosk was not working at the first hub I went to and I had to search for another location.  The kiosk display was difficult to read in bright sunlight and it didn’t have a very user-friendly interface.  You needed to enter your email address and a PIN code, agree to terms, and request a RFID card.  I didn’t see the option to use my TAP card and almost forgot to logout.  Your account number and pin are actually emailed to you.  The PIN didn’t work for the first card I purchased so I had to get another one.  I did try to setup an account at home online but the credit card entry screen was NOT secure and it appeared I had to use the credit the same day so I cancelled it.

The bikes were heavy, but had electronic locks,  8-speeds, bells on the left handle and a front basket.

There are separated pathways for bikes and pedestrian from Santa Monica Pier to Venice Beach Pier.  You need to walk your bike if you want to go on the Venice Beach boardwalk or pier.  I returned the bike before checking out Santa Monica Pier and the pedestrian mall on 3rd St in Santa Monica.

I boarded the 704 bus on Santa Monica Blvd for the 1 hr trip to Hollywood.  Though I had an offline GPS app, the bus automatically announced all stops.  I had to transfer at North La Brea St about an hour later.

The afternoon I explored the Hollywood area by my hotel,  had dinner a Chik Fil A, and prepurchased a daypass on my TAP card for the next day.  The Oscars were upcoming and Hollywood Blvd was shut down to install the bleachers and red carpet reception area for the Dolby Theatre.

With the forecast for 28 deg C, I wanted to get up to Runyun Canyon bright and early when it was cool.  I did do my research beforehand.  The trails though not signposted are wide and it would be difficult to get lost since you had a clear view of most of the canyon and trails.  The 3.25 mile full loop took about 2 hrs and was relatively easy.  Only tricky part was going down the west trail since it was steep and slippery with the loose sand.

My next stop was La Brea Tar Pits which required taking the bus to The Grove by the LA Farmer’s Market where I could transfer to the LADOT Dash bus which had a stop at the Tar Pits.  The Dash buses operate separately from LA metro, accept TAP payments and are only 35 cents on TAP or 50 cents cash.  Stops are also announced on their smaller buses.

After the museum, I headed back to the hotel to grab my bag and then rode the metro to Union Station downtown.  One interesting point in taking the metro is that you DON’T need to tap out when exiting stations which is the first system I’ve encountered that doesn’t require this step.  The gates are also bi-directional.

Though I wanted to explore downtown for the afternoon, my legs were sore after the bike ride the previous day and hike in the morning.  From Union Station,  I checked out Olvera St on my way to Phillipe’s for lunch.  I did notice a Dash bus running outside but was unsure of the route.  Instead of walking back to Union Station (the metro is way on the east side), I should have take the Dash Bus downtown.

After a quick look at Civic Square and Disney Concert Hall, I started making my way to the airport early.  The blue metro line heading south passes Watts Towers and I could have stopped for a look though the area can be a bit dodgy.

I originally planned to take the LAX flyaway bus from Union Station but reports indicated the 30 min travel time gets longer during rush hour.  I had a daypass for the metro already and there is no surcharge for the airport like other metro systems in the world.  It took just over an hour from downtown to LAX on the metro with waits changing lines and for the shuttle.
 

HTPC Keyboard and Mouse Options – Logitech K400 Plus Review

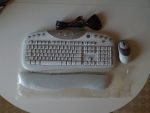
When I built my HTPC many years ago, there weren’t a lot of budget keyboard options so I just picked up the Logitech Cordless Navigator Duo.  This served me well for many years since I used rechargeable Eneloop batteries and the keyboard was barely used.  The mouse worked well on the carpet or couch.  What was annoying was that moving the mouse would wake up my sleeping PC (though I could’ve disable this in Windows).

For small amounts of typing, I generally use Window’s built in On Screen Keyboard under the Accessibility tools with my mouse.  I’ve stickied this program to the taskbar.  I’ve also experimented with the Unified Remote app which lets you use your tablet or smartphone as a keyboard/trackpad combo.  It was simpler just going back to the mouse.

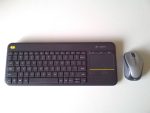
With the recent Boxing Day sale, I decided to upgrade my keyboard for the Logitech K400 plus for $25 on sale.  This compact keyboard features an integrated trackpad.  Other features include a USB unifying receiver dongle (instead of a big bulky receiver) with a storage location inside the keyboard’s battery compartment (clip in the cover itself) and an on/off switch.  Cons include bunched up arrow keys and the PC sleep button requires holding down the FN key.  Range was not an issue even with the dongle plugged into the back of the PC.

Since I have become too familiar with using the mouse and with the unifying receiver dongle supporting multiple devices, I picked up a compatible Logitech M317 mouse on ebay for about $3 USD.  The newer cordless mouse technology only needs 1 AA battery and has an on/off switch on the bottom.  Pairing the mouse with the receiver was as simple as downloading a small app from Logitech and turning the mouse off and on.  There are no problems having both the trackpad on the K400 keyboard and mouse both enabled.


Calypso CLP-40LC1 No Picture Backlight Turns Off

This TV was sold by Staples in Canada.  Googling some of the board numbers, this TV may share boards with models Sansui LCT40SD and Samsung LE40A457C1D.

When plugged in, the indicator LED lights up red and when power button is pressed, the LED turns green and the blacklight flickers on and then promptly shuts off.  Backlight circuitry typically will have protection to shut down if a problem is detected.  This problem is commonly described as having sound but no picture.

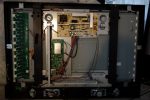
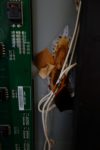
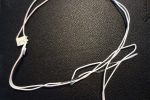
Taking the back off, there was a burnt area of wire where it was taped to the back panel.  This TV design has the high voltage  inverter built into the power supply board and high voltage is carried to a balancer board which powers the CCFL tubes with a pink/white wire pair.  There are dangerous high voltages throughout the balancer board (which is why there is a cover) and on the upper left corner of the power supply board.

I googled the power supply board number and got misdirected to a potential problem with the FET transistors on the power supply board due to discoloration in that area.  When I took out the power supply board and reattached it to measure voltages, the backlight started to work again.

With the power unplugged, I re-investigated the burnt area and found that the insulation had melted away in several spots where tape had bundled the wires together.  The high voltage in the wires had heated up the tape, burning it, melted the wire insulation, and caused shorts.  I removed any remaining tape, shortened and spliced the wires together and reinsulated it with heat shrink tubing.  This design problem could have been prevented with thicker wire or non-flammable tape.  The wire was also too long and then bundled together which generated more heat.

With this simple repair to the wires, the TV is now working again.

Canadian Tire Garrison EA20 Safe Recall Model 046-0035

I was cleaning out some junk from my parents and found an unused electronic personal safe.  They had bought it from Canadian Tire and ended up not using it.  While testing it, I ended up locking it accidentally and realized I was missing the backup key to open it.  The lock is hidden under a removable front panel.  A quick google search found some youtube videos of how to open similar safes without the need of the code or the key by just pounding on the top while turning the knob.  Remarkably, this actually worked.  Google’s predictive search also led me to the search term “garrison safe recall” which led me to the recall notice here.   It is illegal in Canada to sell or give away recalled items.  Strangely, this item is still available on Canadian Tire’s website (maybe the problem has been fixed?).  I took it back and got a full cash refund on the non-sale price.

Unclog a Toilet with a Toothbrush Dropped Inside

My mom called me since their toilet was clogged with a dropped toothbrush.  I used a snake and got it to flush but it clogged again since the toothbrush was probably still inside.

If you look at a diagram of a toilet, the toothbrush is probably lodged at the U turn at the top of the trap since it can’t get past it.  Liquids will be fine but solids will get trapped.

Searching online, some solutions include removing the toilet, draining the trap and fishing the toothbrush out or melting it with a hot piece of wire.  One unusual suggestion was to attach a balloon to a plastic pipe and inflating it.  This seemed viable and a lot less work so I tried it.  I was a little skeptical since I didn’t think the balloon would be strong enough.

I had some plastic supply line pipe used for sinks and put a balloon at the end and secured it with some duct tape.  The pipe didn’t seem long enough so I extended it with another pipe and some more duct tape.

I assumed I needed to get the balloon past the U-turn and toothbrush so I cleared the drain a second time with the snake so that it could flush.  I couldn’t get the balloon down the drain as far as I wanted but decide to inflate the balloon anyway and gave it a pull.  This worked and the toothbrush dropped down.   It seems you only need a little friction against the toothbrush to dislodge it so you only need to push the balloon as far as it can go.