I thought that the wipers needed an adjustment but the main culprit is a worn bushing on a wiper rod. The entire rod needs to be replaced.
Here are two youtube videos to for this repair. It is relatively simple but here are some extra tips.
You do not need to remove the enitre wiper assembly. The rod can be removed with the assembly bolted in place. I used a rubber mallet to pound the new one back in.
The weatherstripping does not need to be completely removed. You only need to remove it up to the split point where the two sections join. I removed it from the shorter passenger side. To put it back in, it is held by T-clips. It is easier to pry out the clip first before inserting it back into the weatherstrip.
There are only 3 clips holding the cowel down. They are on the edge of both sides and at the point where the two sections join.
Have a vaccuum ready to clean out any debris under and around the cowel and wiper bolts.
You don’t have to replace the two rods in the wiper assembly. The shorter upper rod (Rod Unit A) tends to wear out on the inside bushing. Part number is 76540-S6M-003
My factory alarm failed to arm after pressing lock on my key fob and I suspected a bad actuator. The alarm will not arm if all the doors and the trunk are not locked. I had replaced both door actuators already with OEM ones so have encountered this previously. Checking all of my locks, the trunk was not locking.
Found this guide here for replacing the trunk actuator. Confirming the part number 74896-S6M-A01 online, I found an aftermarket for $13 USD on ebay, Dorman 746-747 for $70 USD on Amazon and an OEM for $130 USD. Ordered the cheap aftermarket one since I don’t intend to keep the car for long. OEM pricing is pretty ridiculous for a molded part with just a small electric motor and some gears.
In the meantime to lock the car, there is an access panel in the hatch for replacing the third brake light bulb. There is a white lever accessible which can be switched to lock the trunk. If it is unlocked, you can switch it to the locked position before closing the trunk. If you can’t unlock it with the remote, you can crawl through the trunk to unlock it.
Will update once I install it and see how long it lasts.
If you still have your original blade assembly, here are the part numbers for the wiper refills. Remember when installing the spines, they should bow outwards. Acura parts are same as Honda so you can find them at Honda dealers.
Front driver – old:76622-SLA-004 new:76622-SLA-004 (600mm) Front passenger – old:76632-S6M-003 new:76622-SF4-305 (500mm) Rear – same as front passenger (500mm)
My SRS light came on which is a warning about the airbag system. Found this post on how to reset it but it wouldn’t reset. I had made a jig with wires soldered to a toggle switch to make it easier to perform the procedure.
I plugged in my OBD sensor and it didn’t display any fault codes. I found this post which allowed me to read the fault code of 9-3 by jumpering two OBD connections. The fault code indicated a faulty driver’s side belt buckle switch.
This video shows the complete procedure to fix it on a civic. My torx screws are the style that have a pin in the middle and I didn’t have the correct bit to remove it. My switch appeared to be working observing the seat belt indicator on the dash so I sprayed some air inside the buckle to help clear it. I then repeated the original procedure to clear the error and it finally cleared.
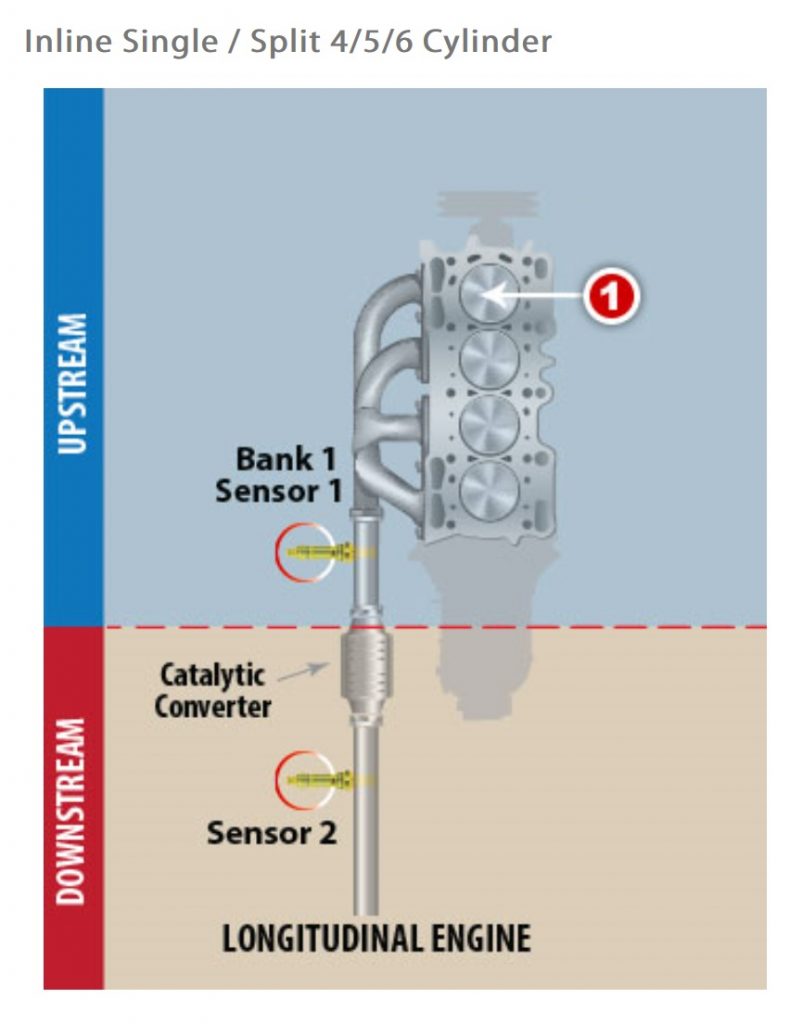
My friend’s RSX was getting OBD codes P0137 , P0138 and P0139. All three codes are for the O2 sensor (Bank 1, Sensor 2) but there are two sensors for the RSX. It is a bit confusing to determine which sensor needs to be replaced and which sensor is upstream or downstream.
This webpage from Denso explains the banks and sensors. Click the Performance tab. With a straight four engine, there is only one bank on the RSX. Sensor 1 is upstream and located before the catalytic converter and also called the Air Fuel Ratio Sensor. Sensor 2 is downstream and after the catalytic converter.
Honda OEM sensors are made by Denso so it would be cheaper to get a Denso sensor. Searching the part number on Denso yields the following part numbers.
234-9004 upstream sensor (non Type S, manual) – Acura part 36531-PND-A01 234-4122 downstream sensor (non Type S) – Acura part 36532-PND-A01
You can find these parts on Amazon both US and Canada.
The service manual describes sensor 1 as primary and sensor 2 as secondary.
RSX O2 Sensor Locations from Service ManualSensor Descriptions from Denso
My friend’s RSX blower wasn’t working so he brought it by for me to help him debug it. The fuses appeared good and once in a while it would start up for a few seconds. Searching youtube, I found the following video which points to the culprit as a thermal cutoff.
The video links to this webpage with instructions on replacing the thermal fuse in the power transistor module.
Measuring the resistance across the fuse indicated it had opened. Checking the cabin filters, they were very dirty and would have caused the overheating in the module with the airflow restricted. The service manual recommends replacing the cabin filters every 2 years or 48000km.
The part number for the module is 79330S6M941 and it can be found on ebay for around $15 USD.
The Digikey part referenced in the link to replace the thermal fuse is obsolete and no longer available. Digikey part 317-1134-ND appears to be a close substitute and available if you want to just replace the thermal fuse. The leads are a bit thicker and won’t fit through the old holes so you need to bend it inside the pcb to make contact with the top of the circuit board.
I had to get my starter replaced under warranty from my mechanic but that evening when I got home, the check engine light came on. I have a Fixd OBD2 so I connected to find out the error code was P1078 – Intake Manifold Runner Control System Malfunction High RPM. Since replacing the starter involves removing the intake manifold, I suspected a loose or unconnected connector. Error description available here https://www.autocodes.com/p1078_acura.html
Poking around the intake manifold valve at the left side of the engine cover, I found one of the connectors in front of the valve wasn’t pushed in all the way. The connector can be seen in this youtube video at the 1:03 mark.
I plugged the ODB2 sensor, revved up the engine past 5000 rpm and the error had cleared.
I was having intermittent starting problems with my Acura. Mostly when it was warm but sometimes when it was cold. Starter wouldn’t crank at all but would eventually start if I waited a minute or two. There are three potential failure points: the battery, the clutch switch and the starter itself. Talking to my mechanic, he suspected the starter since my battery is only 2 years old.
The starter on the RSX itself is fairly easy to replace but the problem is getting at it in the cramped engine compartment. With the RSX, the intake manifold needs to be removed and the radiator loosened to get it out.
Starters are electric motors and will have worn out and dirty contacts over time and can be rebuilt by replacing these parts.
In hindsight, I should have purchased a remanufactured starter on ebay from the US and saved over $100. New substitute starters are even cheaper.
If your starter isn’t turning, you can try hitting it with your lug wrench or a hammer from underneath your vehicle to create some contact to get it going.
The paint on the bottom molding on my driver’s side window was cracking and peeling exposing the chrome underneath. Replacement pieces are $61 USD part numbers 72450-S6M-003 (left) and 72410-S6M-003 (right). Online forums suggested repainting it instead of replacing.
Removal is fairly simple and there are some online videos on the procedure including the one below. Lower your windshield and twist it out from the pillar side first.
Once it is out, give it a good cleaning since it gets gunky. Using a razor scraper, scrape the paint off the exposed surface. I went a little too far and scraped the edges and ending up showing a small gap when I reinstalled it. Just scrape the front face.
Once I got rid of all the peeling paint, I sanded it down with some 150 grit sandpaper. I then cleaned the surface with rubbing alcohol. Next I masked off the edges with painters tape to prepare for painting.
You can use spray on truck bed liner or plasti dip but I just used flat black enamel spray paint. I gave it two coats with a bit of drying time between coats. I did get some bubbling so you should spray outside the area first to clear any air inside. Don’t apply it too thick or else it will run.
I did miss a narrow strip at the bottom so will need to redo a bit of it and will repaint my wiper arms at the same time.
Update: Had to do the passenger side as well since it has started peeling. The drivers side has held up well.
My latest project is to upgrade my interior and exterior lights to LED for my 2002 model vehicle. LED bulbs are fairly inexpensive on ebay, especially shipped from China.
With LED bulbs, you can get a bright white light and you won’t have a dead battery the next day if you leave your dome light on. There are two styles of LED bulbs – one made with modules and COB (chip on board) where the lighting element is directly mounted onto the board. COB should be theoretically more reliable with less solder connections.
Here is a listing of the bulbs for 2002-2003 Acura RSX from my research –
Interior
Map light (x2) – DE3175
Dome light – DE3175
Glove box light – DE3021 (DE3175 will fit if it’s narrow)
Trunk light – 168
Cup holder light – T5 mini
High mount stop light – 7440
Exterior (not including headlights)
License plate – 168
Front side marker (x2) – 168 AMBER – these are visible so get nice looking ones
Front turn signal (x2) – 7440
Rear turn signal (x2) – 7440
Rear side marker (x2) – 168
Rear tailight/brake (x4) – 7443 (incandescent bulbs are dual filament with 4 leads and 2 levels of brightness)
Backup (x2) – 7440
Most of the interior bulbs can be accessed by popping off the plastic lens cover with a narrow flat blade. Exterior bulbs are typically removed by turning the holder 1/4 turn counter clockwise. LED bulbs have polarity so flip them around if they don’t light up.
DE3175 LED bulbs can be quite wide to provide the surface area for the module. Be careful when choosing from the many different versions.
Update 1: My DE3175’s arrived and were fairly easy to install. I used a 1″ scraper to pop off the covers. The bulbs I bought fit the glove box light as well. To access this bulb, it is easier to pop the glove box stoppers out from the sides. Empty the glove box and push the stopper from the outside towards the inside and it should pop out. The glove box can now flip all the way down and out of the way. You now have better access to replace the bulb. Note that the sidelights need to be turned on for the glove box light to come on.
Update 2: My 168 bulbs came in. I ordered COB LED rated at 80 lumens and 1W. The old incandescent bulbs are marked 5W which convert to 75 lumens so the LEDs should be slightly brighter. 194 bulbs are 3.8W for incandescent and compatible with the LED version.
Update 3: My 7440/7443 COB LED bulbs came in. They are very bright. For the turn signals, the lower power is causing the flasher to hyperblink (blink fast) which usually happens if you have a burnt out bulb. I have ordered a new flasher module that is LED compatible in order to use the LED bulbs.
For the tail/brake lights, the bulbs are not making good contact on the low side but work ok on the high (brake) side. The wires on the LED are a bit thinner than the incandescent bulbs and I need to figure out where contact is being lost.
Update 4: The T5 mini’s came in for the cup holder. Pry the assembly out with a small screwdriver and twist the holder to access the bulb. It will pull straight out. The LED replacements are a bit long and the lens is a narrow slit so the light doesn’t hit it properly. There isn’t much light coming from the cup holder so I put the incandescent bulb back in.
L-R: DE3175, DE3021, LED DE3175 replacement for both