Category Archives: Car Repair

Acura RSX Water in Trunk and Wet Rear Seats – Replace Tailight Gasket

After some subzero temperatures and heavy rain, I noticed my interior was very humid which lead to finding my rear seats wet and about 2 inches of water in my spare trunk wheel well.  Google indicated my tailight gaskets were probably leaking.  I vacuumed out about 8L of water.  There is a foam pad from the rear seats that goes inside the well which ended up wicking the water up to the seats.

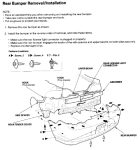
If found a guide here and dug out my service manual on how to remove the bumper.  Looked pretty straightforward so I decided to attempt to replace them myself.

Acuraoemparts wanted $10 USD each and $5 shipping to the US.  Part number is 33502-S6M-A11  The dealer charged $21 CAD so I bit the bullet since I needed them changed out before it was going to rain again.  I had to phone around to find a dealer that had 2 pieces in stock.

The service manual indicates you should have a helper to remove the bumper but I found that I didn’t need  one.  The bumper is fairly light and I put a milk crate under the bumper to rest it while detaching the license plate light.

The bumper is held by 3 philips screws on each side by the rear wheels.  One is hidden and pointing up.  I had one extra screw on each side from the mudflaps.  The entire mudflap doesn’t need to be removed, only the two screws attached to the bumper.  It was a little difficult to remove these since the tire was in the way.  Even a stubby screwdriver was too long so I ended up using the philips stubby bit and a wrench.

There are pop up retaining clips under the bumper.  I broke one removing it and the second one was already missing.  I am going to order some ebay since they are much cheaper.  Part is 91503-SZ3-00

With all the screws and retaining clips removed, the bumper snaps out fairly easily.  The license plate light assembly is attached to the bumper with clips so I used a flat blade screw driver to release the clip and free it.  I could then set the bumper out of the way.

With the bumper removed you can access the two screws holding each tailight assembly from the bottom.  I popped off the center interior panel easily to get better access and unscrewed all the bulbs.  Four 8mm nuts held the assembly in place and were put on fairly tight by the factory.  I made sure I had them tight when I reassembled.

With the tailight removed, parts of the old gasket remained due to double sided tape in four spots.  I scraped all these off to get a good seal with the new gasket.

Putting everything back together was straightforward as well.   Make sure you install the bottom tailight screws before putting the bumper back on.

My service manual is for a 2002-2003 RSX though 2004-2006 should be similar.

Update 1: After replacement, I am still getting wet rear seats and a bit of water in the trunk wheel well.  I think I have clogged moonroof drains.

Update 2: My mechanic indicated my moonroof drains were not blocked and suspected the weatherstripping around the hatch.  I ordered the part#74440-S6M-003 from acurapartswarehouse.com  The service manual indicates it is just pushed in so it should be relatively easy to replace.  There should be an alignment mark at top center of the weatherstripping.

Update 3:  The weatherstrip arrived.  Fairly easy to install though a rubber mallet might have helped.  It was a bit tricky to get the weatherstrip over the rear hatch panel and the headliner.  There is a painted alignment mark on the weatherstrip and the service manual indicated to align it with the center of the hatch.  I assumed it meant top center.


Replacing Power Door Lock Actuators 2002 Acura RSX

My car alarm wasn’t arming one day and I realized that the passenger side door wasn’t locking with the key fob.  Once I manually locked the door, the system would chirp and arm.  It was obvious the power door actuator had failed.  Searching for the part on online part stores gave me a part number which I could then comparison shop.  There were lots of non-OEM parts on ebay for less than $10 USD  and the cheapest original Honda version was around $55.  There could be a huge profit potential in counterfeit parts by putting a fake Honda sticker on the cheaper part.  The ebay seller I ended up buying from, hondapartshub, was a Honda dealer with an online parts store.  The same actuators are used in model years 2002-2006 for the RSX and in other Honda models like the Odyssey.

I found a guide to replace the actuator here but it was missing a few tips and steps.  You have to remove the door panel first which is fairly easy.  Once you removed the handle, power window switch and the 3 screws, you can easily pop the door panel off from the bottom and lift it up without any special tools.

With the actuator, you need to disconnect two rods to be able to pull out the assembly.  The gold coloured rod needs some pressure to release it (use pliers or pry with a screwdriver) but it will come out.  If you don’t disconnect it, you will end up bending the rod that goes up to the top of the door.

I also had some problem with the three screws at the edge of the door holding the latch.  You need a #3 phillips (with a flatter tip).  A normal phillips bit could strip the screw head.

To get at the latch, you will also need to remove a 10mm bolt that holds a guide rail for the window.

My last mistake was to not remove the protective cap on the new actuator before installing  it since there is a small clip that holds it in place.

The same day I replaced my passenger side acutator, the driver’s side failed.  The part for the driver’s side I ordered from a different ebay seller.  My original replacement was in a bubble wrap bag with a Honda sticker and one of the terminals capped.  The replacement for the driver’s side came in a box with a sticker, no bag and no cap though the ebay picture showed the part in a bubble wrap bag.  I am a bit worried that it was counterfeit but have no way of knowing for sure.  That seller’s store sells a lot of Honda parts.

Edit: My friend’s Acura had failed actuators and I purchased a non-OEM set (right and left) for him on ebay for $20USD and helped him install.  Seems to have no issues with them so far.

Update: My friend’s $20 actuator failed on one side.  It was also blowing the fuse as well.  So wouldn’t recommend the cheaper replacements.

Cleaning foggy headlight lenses

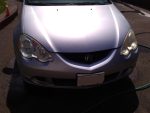
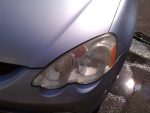
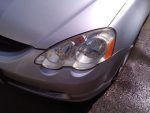
The headlight lens on my Acura RSX gets foggy being an old car.  I purchased Meguiar’s Headlight Restoration Kit based on good online reviews.  Think I picked it up at Walmart in the US though it is available at Canadian Tire and Amazon as well.  The kit comes with a buffing pad you attach to your drill, polishing cloth and polishing paste.  It is pretty easy and quick to use and has excellent results.  I do need to repolish every year though.

Update: Further research indicates the headlight get yellow because of UV and that the factory installed clear coat has worn off.  There are multiple youtube videos on how to apply a clear coat to your lens so you don’t have to constantly restore it.  Will be a project for the summer.


92-97 Volvo 850 Stuck Glove Box Repair

My dad called me since the glove box on their Volvo was stuck.  He phoned the auto repair shop and they wanted $200 to repair it.

Searching the internet, the best site to fix this problem is here http://www.matthewsvolvosite.com/fix-a-stuck-glove-box-tutorial.html   I followed their procedure and found it was missing a few steps.

I drilled a very small hole following the instructions there and managed to open the glove box door after a few attempts.  You need to push into the hole and lift up to release the latch.  I used the end of a smaller drill bit.

Once opened, the glove box panel needs to be removed to work on it.  First remove the seven philips screws.  Removing the plastic supports on the sides first will make it easier.  From the back of that panel, insert a flat blade screwdriver into the slot where the support attaches and pry it to release the support.  I would also put some tape on the ends so they don’t fall back into the dashboard.  This did happen to me on one side so I had to remove the bottom panel held by three Torx T-25 screws to retrieve the support and push it back through the opening.

Once you have the door removed, you can see how it works.  Lifting the handle rotates the bar which connects to a piece with a nub that pushes the latch open.  This nub breaks off and can be replaced by drilling a hole and inserting a small machine screw.  The metal is soft enough that you don’t need to tap it.  You can also replace the whole piece by searching for the part on ebay.  I found a kit that included the latch hook and retaining clip.

To get at the assembly you will have to remove the three screws.  Before this step, make note of the spring that will pop out.  It pushes the door away from the latch once opened.

I didn’t need to disassemble the piece that broke off to drill a hole to insert a screw.  Just find a screw approximately the same diameter as the piece that broke off and use a drill bit slightly smaller.

I have a vinyl repair kit that I can use to fill in the hole I drilled to complete the repair.

Latch part