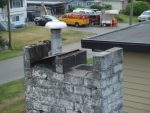
When I bought my house almost 20 years ago, they had previously installed a gas fireplace in the basement and did a sloppy job on the exhaust pipe which ran up the chimney. The cap had been removed and the second flue had been exposed. Only recently did I decide to fix this with a new chimney pot. I found a masonry supply store nearby, I-XL Masonry, and brought them measurements and pictures to get the correct size of a chimney pot. I also picked up a small bag of brick mortar at Home Depot in the US. I could only find large bags in Canada. Research online indicated I should be casting a chimney crown with a drip edge but this would be too much work. I would just use the brick mortar to build a small slope on the top edge for rain water to run down. The first step was to take down the bricks and they came down fairly easy with a small tap of a hammer. Once I cleaned out all the old mortar leaving a level surface, I installed the new chimney pot. I also had some scrap metal screen that I used to cover the flue to keep animals out. I then applied mortar to put a sloped edge along the brick. I did have to go back on the roof a couple of weeks later since I could hear clanging from the chimney on windy days. The cap on the new pot wasn’t sitting completely flush and would rock. I remedied that problem with a little bit more mortar to fill up the space and eliminate the movement.