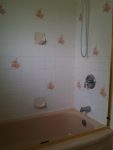
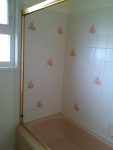
My brown 60’s bathtub was in need of a replacement. The problem I had was mainly the colour of the tub and some rust on the outside lip. The grout had a bit of mildew in spots and I was worried it was coming from behind the wall. The ugly floral tiles and seashell soap holder tile also needed to come down.
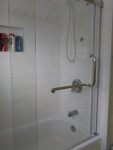
I had replaced the shower valve with a pressure balanced one previously (no more blasts of hot water when someone turned on a faucet or flushed a toilet. See post here. The next step was to replace the bathtub (before the floor and vanity).
To minimize plumbing, I wanted a replacement bathtub close to the height and drain location close to my existing tub. Most tubs carried in big box stores are “above floor drain”. These tubs are higher to allow the drain pipe to run above the floor where the floor can’t be cut out such as in concrete condos. The only model I could find close to my original tub was the Bootz Aloha carried at Home Depot in the US. The Canadian version was an above floor model. Thinking I would need to rent or borrow a truck to bring it back, I measured the box and determined it would just fit into my hatchback so my first hurdle was solved.
I had looked into bathtub reglazing and research indicated it only lasts about 5 yrs. I did find an epoxy painting product but for both, the cost would almost be the same as a new tub.
The next design challenge was choosing a backerboard. The best and most economical solution I found was Densshield which is a drywall product coated with a waterproof layer. I did my research and read and watched a few installation videos on youtube.
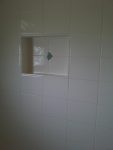
One feature I did want to add was a shower niche. I looked at buying a pre-built niche and ended up building one with 2×4’s and densshield.
With densshield, the face is waterproof but the edges are not. In their videos and instructions, they recommend using polyurethane sealant or silicone to seal joints. I picked up Sikaflex sealant from Home Depot for this application since thinset would more easily adhere to this.
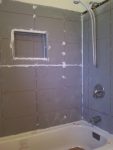
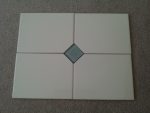
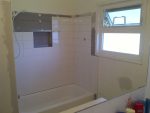
For the tiles, I wanted something that wouldn’t look dated in 10 yrs. Though larger tiles are more modern, subway tiles tend to be timeless. I settled on 6×8 tiles and 2×2 green glass tiles inset in a diamond pattern for a small design feature. I purchased these at Lowes since they are sold individually there.
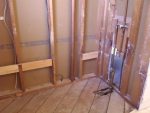
Step 1 – Demolition
My friend came over to give me a hand with the demo and tub installation. Hammering out the tile, the area behind the tub was dry and mold free.
To remove the tub, the drain had to be unscrewed out. I had purchased a drain wrench but it wasn’t really needed and a pair of slip-joint pliers could be used by sticking the pliers inside the drain.
With the tub removed, there was a bit of a time capsule in garbage the original installers left inside the old tub cavity. There was an old pepsi bottle, boxes from some of the bathroom accessories and leftover mosaic tile from the original walls. I considered using some of the original tiles in my design but couldn’t really fit it in.
I took the old 60lb steel tub to the metal recyclers and got a whopping $2 for it.
Step 2 – Tub Installation
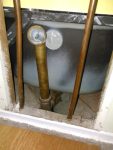
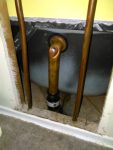
The drain pipes in my 60’s house were 1-1/2″ copper using compression fittings for the tub drain. When we dry fit the tub, the drain location was about 1/2″ off and we were able to line it up by angling the drain pipe. The overflow pipe was too long so I cut it down and used a Fernco fitting to reattach it which also gave it some play to line up properly. The shower valve also no longer lined up to the center of the new tub but it could easily be moved since the copper pipes have a bit of play when not attached to the framing.
When I replaced the drain, I didn’t tighten it enough nor did I check it adequately for leaks so I had to replace some wet drywall on the ceiling downstairs.
There is a good youtube video on installing the Bootz tub from the manufacturer though they don’t recommend any product names.
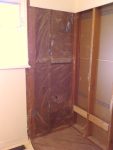
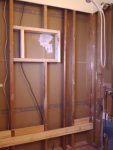
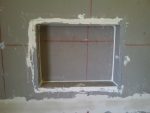
Step 3 – Framing the niche
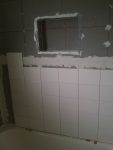
With 6×8 tile, I wanted the niche to fit four of these inside so I made the niche 12×16 which could hold several soap and shampoo bottles. A minor problem arose since an electrical cable ran in the area where the niche was going to be built. Luckily, there was enough slack in the wire after some clips were removed for the wire to go around the niche. I had to be careful with the measurements since I wanted a full tile at the bottom edge of the niche and it had to be centered.
Step 4 – Installing the Densshield
I picked up the Densshield at Lowes and it comes in 60″ x 32″ sheets which is perfect for surrounding a 5ft tub. However, I needed a little bit extra for the sides of the niche and the area beside the bottom of a tub. You should get a 4″ x 32″ strip left over with the two sheets on the main wall. Instead of buying and wasting an extra sheet, I cut strips from the top of the sheet opposite the shower head. This area would be the driest and would rarely be in contact with water.
One question was how to install the Densshield over the bathtub lip. I left a 1/8″ gap (spaced with a nail) and also used 2×4 blocking where possible to give both the lip and Densshield and edge. In hindsight, I should have used a minimal gap like 1/16″ since it is hard to fill a larger gap with the sealant.
For screws, a box of 200 1-1/4″ Rock-On backerboard screws was enough for this project. Screws were set every 6″ following the instructions since it has to hold a lot of weight with the tile.
I put Sikaflex between the butted joint on the wall, the inside corner joints, over the screw heads, and the exposed edge of the Densshield along the bathtub lip. I also sealed all the pipe openings and the edges when I lined the niche with Densshield. There are youtube videos where they use a paint-on waterproofing membrane like Aquadefense or Redguard on the edges but those are not available in small quantities and Sikaflex should work just as good. The Sikaflex does take a couple days to cure so I covered the walls with dollar store shower curtains since I needed to use the shower while it dried.
After it was dry, I reinforced the joints with cement board tape and modified thinset.
There is also a good youtube video from the makers of Densshield on the installation process.
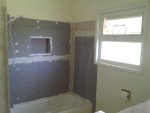
Step 5 – Tiling
My existing tile wall is about 64″ high above the tub. With 6×8 tile, I would need 10 and half rows of tile. I had used the following:
- 4 sheets 5′ x 32″ Densshield (Lowes)
- Pack of 200 1 1/4″ Rock-On cement board screws
- 2 tubes of Sikaflex polyurethane sealant (Home Depot)
- Fibatape cement board tape
- 140 pieces 6×8 tile (Lowes sold by piece)
- 20 pieces 6×6 tile (Lowes sold by piece)
- 4 – 2″ x 2″ green glass tile (Home Depot)
- 50lb modified thinset (I had about 5 lbs left over)
- 2 – 1lb unsanded grout (I had a leftover tub)
- PVC 5/16″ edge trim (Schluter BW80)
- 1/4″ x 1/4″ notched trowel
- budget grout float
- mixer paddle attachment for drill (didn’t buy one but it would have been much easier than mixing thinset by hand) (Harbor Freight?)
The tile count is for 10 rows x 4 for each side wall and x 6 for the front wall with the ends using 6×6 tile. The 10 rows didn’t quite reach the old tile height so I added a row of tiles cut in half so I needed an additional 7 – 6×8 and 2 – 6×6.
I got lucky and found a used tile saw on craigslist for $20. I did want to buy a used one since I wanted to take my time and not be rushed with a rental saw.
For a decorative feature, I bought some square 2″ glass tiles and would embed these in a few corners in a diamond pattern.
The first row is the most important and needs to be level. Don’t count on your tub being level. You do want the widest gap to be minimal since it has to be covered with a bead of caulking.
I had originally bought tile adhesive which had indicated it was good for wet areas. After some online research, I returned it and switched to using modified thinset.
For caulking, it is recommended to use 100% silicone with mildew protection for bathrooms. I used GE Silicon II which has a short handling time.
I took my time and tiled over several days. For spacing, I used the nubs built into the tile instead of tile spacers. With both the densshield and sikaflex, I knew my walls were waterproof behind the tile.
To cut the tile for the openings, I used both a circular tile cutter I purchased at Harbor Freight and the tile saw. Since the wall was not perfectly plumb, I did a lot more tile cutting than I had originally planned.
Step 6 – Grouting
I had some leftover grout and the online MAPEI grout calculator indicated I should have enough with an extra 1 lb.
Grouting is pretty basic but a little tedious so I worked in sections. I also wanted to make sure the colour matched my tile when it dried.
I did contemplate sealing the grout but didn’t do this extra step.
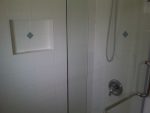
Step 7 – New Shower Door
One thing I didn’t want was an ugly shower curtain with my new bathtub and tile walls. I was looking into a glass screen but found a modern, frameless sliding shower door at a local importer of Chinese made building products. The door is thick 8mm tempered glass but instructions were minimal other than an autocad drawing.
I installed the fixed glass panel first determining the position with the plastic guide that installed in the middle of the tub wall. Though the instructions were to screw it in place for an acrylic tub, I just siliconed it in place. From the position of the panel, I could mount the edge frame and screw it into the wall. Holes were easily drilled into the tile with a new masonry bit and some tape on the tile to minimize the bit from wandering.
With the fixed panel in place, I could then install the top rail since it is attached to the fixed glass panel. The allen key for set screws for the rail supports were not included but luckily I had a correct metric key in my tool box.