Category Archives: Home

Online ordering from the US to Canada

In my first experience with online ordering, I purchased some car parts which were shipped UPS.  On delivery there was a large bill for taxes and brokerage fees.

Another time, I used an online logistics company that received the order, processed the paperwork and forwarded the package to me.  I actually wanted to do a return when I received the item and it was easier at that time just to resell it on ebay.

Canada Revenue Agency requires taxes be collected for declared values over $20 CAD and couriers are notorious for high charges for handling.  Express services tend to waive brokerage fees and if shipped USPS, Canada Post’s charge is a flat $9.95.  http://www.cbsa-asfc.gc.ca/import/postal-postale/duty-droits-eng.html

Make sure your seller accurately indicates the value of the item on the declaration form the amount that you paid.  If they lazily declare some higher value, your taxes will be calculated on that higher amount.  You can submit for a refund if this happens.  The instructions are usually on the back of the declaration form.

Courier Brokerage Fees for Canada

Here are links to their fees – Note that this is for clearance only and does not include duties and taxes.

  • UPS
  • DHL – Link indicates a flat fee of $10.50 is charged PLUS a $4.25 transaction fee
  • Fedex – free clearance for Priority

Clearing Customs Yourself

One way to get around brokerage fees is to clear customs yourself which involves a lot of running around.  It may easier to request them to ship USPS and pay the $10.  Here are the steps if you want to try it and live near the airport.

  1. Ask the shipper to mark “Customer will clear customs” on the outside of the package.  Make sure they have your phone number and email.  You may want to contact the courier directly once you get the waybill number and ask them to hold it for self-clearance.
  2. When the package arrives, you will need to grab the paperwork from their depot.  The courier should provide an address.  In metro Vancouver, the depots are all located by the airport.
  3. Take the paperwork to the CRA office usually nearby and pay the necessary taxes.  Take the receipt back to the depot and they will release your package.  In Richmond BC, the tax office is in the blue building on Miller Rd beside Tim Hortons.
  4. There is a chance the courier will ignore the instructions and do the brokerage themselves anyways.

Package Receiving

The easiest way to receive packages if you live near the border is to use package receiving services in border towns.  You have to declare your purchases crossing back into Canada but typically, they won’t make you pay for small amounts.  It also depends on how busy they are, though technically you are required to pay taxes on all imports.  Exemptions only kick in after absences of more than 24 hours.  These services are great for buying from sellers that will only ship to the US.  Amazon US will also ship to third party addresses.  You also have exemption if you are away for more than 24 hours.  See here.

Receiving services I’ve used before include

Point Roberts

TSB Shipping – Directly beside the post office.  You will need to register to receive USPS packages.

Blaine

Most services require a yearly fee.  Here are some that don’t.

Blaine Enterprises – No registration required and no notifications. $3 for small packages. Not great hours – 9 to 5 weekdays and mornings on Saturdays. Friendly but a bit disorganized without the pre-registration. I’ve had to go in the back and search for my package a few times. Two week free hold and they take large packages for a slightly higher fee.

247parcel – Recently expanded out into a much larger building with more lockers. Open 24/7 as the name suggests with automated lockers. Free SMS and/or email notification. Free registration. $3 for small packages. One week free hold. Need to prepay online.

5dpackages – Newest and cheapest service. Only $2/small package. Open late til 9pm and weekends. Free email and/or SMS notification and registration. Free 30 day hold. Have used many times with no problems. Use the referral code here for free $5 credit (I get credit as well, win-win). https://5dpackages.com/?r=5536WN
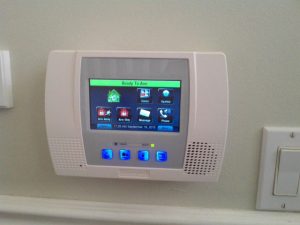
Installing a Honeywell Lynx L5000 Wireless Monitored Alarm over a VOIP connection

To save on my home insurance, I decided to install a monitored home alarm system.  For a simpler install, I decided on a wireless Lynx system with components readily available on ebay and lots of tutorials online including youtube.  A traditional wired alarm system usually has a control panel with a processor board inside with wires to all the sensors, keypads, and a connection to a hard-wired phone line.   The Lynx system combines the alarm processor and keypad into one unit with wireless sensors.  Batteries on the sensors are supposed to last 5-7 years.

For the Lynx system, there are a few models available

L5000 – first generation, 4.7″ touch screen, no wifi option, no 3G/4G module option – discontinued?

L5100 – Added features include Z-Wave (home automation control) option, wifi module option, Total Connect (requires monthly subscription for browser/app control)

L5200/L5210 – Added video viewing,  Lynx Connect app,  and upgradeable firmware

L7000 – same as L5200 with 7″ touchscreen and phone line monitoring no longer supported

Though internet monitoring (either wired or wifi) sounds great on paper, my discounted monitoring company will charge extra for this ($8-$10).

With these options, I decided on the L5000 since I don’t need home automation and wanted to use my VOIP line.  The main reason for my alarm is to save money on my home insurance and I’m not protecting a gold vault in my house.

Setting up the system and adding sensors is fairly simple following guides online.  You need to run power from an outlet (low voltage through an included AC adapter) and then telephone wire to your phone line.   I was going to add an AC outlet high up in a closet but it was simpler to just go through the wall to a pre-existing bedroom outlet on the other side of the wall.   I purchased a door sensor for the front door, infrared motion sensor for the hallway and a smoke detector (now I have two).   I also purchased a key fob but didn’t use it since I didn’t want to load up my key chain with a second fob.   I later added a flood sensor for the water heater in the basement and second door sensor for the sliding door.  One thing I was confused about was I thought my alarm model didn’t have the option to timeout the display but it does.

For VOIP, there could be a lot of problems connecting to the modem in the alarm.  To maximize my chances for success, I set my ATA adapter to use the G711u codec (less compression than G729) .  For your router, you want to prioritize voice packets (do this if you have VOIP).  For my Linksys E900 router, under Applications & Gaming->QoS, I made sure WMM Support was Enabled, Internet Access Priority is Enabled and added a Voice Device, entered my ATA adapter’s mac address and set the priority to high.

The Monitoring Center came by to configure and test my system and collect payment.  They charge $10/month for basic monitoring with 6-month signing bonus and $100 activation fee.


Reduce your house insurance premiums

Every year, my house insurance premiums were increasing significantly.  I finally phoned them to see what I could do to reduce costs.  Here are some ways to cut down your costs.

Install a monitored alarm system – there should be enough savings to justify paying a monthly $20-$25 fee for monitoring.  For my policy, savings were approx $600/yr.  Alarm monitoring is a cash cow so most companies will install a system for free or heavily discounted.  I installed my own wireless alarm system, the Honeywell Lynx L5000.  See my post here.  I am also using a discount alarm monitoring service, The Monitoring Center, for only $10/month.

Update your house information – if you have a new furnace, water heater or roof, this should decrease your premiums.  Let your insurance company know if these items have been replaced

Earthquake Insurance – Though I live in an earthquake zone, I decided not to renew my earthquake insurance.  With a super high deductible ($40K), insurance would not even cover repairs less than that amount.  For fires or floods caused by earthquakes, this is covered already.

Increase your deductible – Higher deductibles will have lower premiums.  Choose a deductible you are comfortable with.

Other discounts – Discounts may be available for having auto insurance with the same company.  Shop around and compare.

My insurer since I’ve owned my house is Canadian Direct Insurance.  I was able to get a quote online with BCAA but the premiums were more than I was currently paying.  Here are my quotes for my detached house.

2015 – $784 (no earthquake, monitored alarm) $1218 (earthquake, monitored alarm)

2014 – $1845 (earthquake, no alarm) $1184 (earthquake, monitored alarm, updated furnace and hot water heater)

2013 – $1739, 2012 – $1638, 2011 – $1523, 2010 – $1383, 2009 – $1261, 2008 – $1195  ….  2003-$814  (earthquake, no alarm)

Save money and energy by replacing your old fridge

I had two old fridges more than 15 years old in my house.  The downstairs one had been repaired a few years ago for a broken heater while my upstairs one had a recent problem with a stuck defrost timer which I replaced with a part bought on Amazon.  After the repair, I noticed the fridge seals were in rough shape so I started searching Craigslist for some used fridges.  Modern fridges were supposedly more energy efficient so I was looking for something newer but used to save some money.  I found one for $100 that had a cooling problem in the fridge section,  but the seller indicated the freezer section was fine.  There was probably ice blocking air flow from the freezer to the fridge compartment that a manual defrost fixed easily.  A few weeks, later I found a second one (same model) for $200.

My local utility, BC Hydro,  had recently switched to smart meters and offered a $75 rebate for decreasing energy usage by 10% over a year.  They also had a fridge buy-back program which would start in the spring and would pick up and give you $30 for an old running fridge (max two claims lifetime on your account).

So the energy savings after replacement were about 50%.  My electricity bill went from between $150-$200 every 2 months to around $100.  The electricity savings alone paid back the cost of the fridges not even counting the $135 in rebates.

Not only are modern fridges more efficient, they run less since they use thermostats to cool only when needed.  Old fridges use timers and are on a cycle of either being fully on or off in defrosting mode.

Here is my energy usage graph.  In Aug I had new tenants.  They said the fridge was cranked all the way up so they turned it down.  End of December, both fridges were replaced.

fridgesavings

Replace your old shower faucet

If you have an old shower with separate hold and cold taps, you know the pain if someone flushes the toilet or runs hot water elsewhere in the house.  Modern shower valves solve this problem by equalizing water pressure and maintaining temperature if this happens.

I was watching an episode of “Ask This Old House” where they replaced a dual tap shower valve with a newer mixing valve.  The trick was to use a special plate which would cover up the hole left by the old handles.  I decided to attempt this reno on my own tub but instead of using a plate, I would patch the tile.  This would be  a “temporary” fix until I could replace the tub and re-tile the walls.  Replacing the faucet would need to be done in a complete bathroom reno anyways.

I had access to the back of the shower through an access panel in a bedroom closet which made this job much easier.  I was also able to match the almond tile colour with bulk tile found at Lowes (buy a few extra pieces in case of breakage).

One of the trickier parts of the job would be cutting the tile for the openings for both the new valve and spout.  I ended up buying a circular tile cutter from Harbor Freight to do this.

I hadn’t soldered pipes before (only electronics) and had a very old propane torch.  As with any soldering, surfaces need to be very clean and flux needs to be applied.  With the torch, it was a bit difficult to light and took a few attempts so it’s best to do it outside.  When soldering pipes, the joint heats up in seconds.  You want to apply solder letting the heat of the pipe melt the solder and not the heat of flame.  If you make a mistake, you may only have one chance to reheat it to make adjustments.

One problem I had was I dropped the elbow for spout pipe in the floor cavity while trying to re-align it to get it perfectly 90 degrees to the wall.  I had to make a quick trip to Home Depot to get a replacement.  In hindsight, I should have made sure it was supported properly while I soldered it and temporarily put a pipe into it to judge the angle coming out of the wall.

Another problem I spotted, luckily before I started soldering, was that the original spout and taps were not in line with the drain and centered on the wall (not tub).

Another small mistake I made was applying too much adhesive to the tile.  I didn’t dry after a day so I removed it all and tried again with much less.