My friend’s HP laptop wouldn’t boot and had a steady blinking caps lock key. A band-aid solution was found online which involves wrapping the laptop in a blanket to force it to overheat (approx 15 min), popping out the battery to shut it off and then powering up again. As crazy as this sounds, this technique actually works and he’s been using this technique for a couple of months, moving all his files to cloud storage. Sleeping the laptop instead of powering off makes the problem occur less often.
This technique has been used on Xbox’s and the root cause seems to be failing solder joints on BGA (ball grid array) contacts for the video chip. A proper fix would require the chip to be re-balled (expensive repair) and home fixes include baking the board in the oven or reheating the chip with a heat gun or butane torch. Home fixes only seem to last a couple of months.
He will probably end up buying a new laptop and give his old one away.
Update: I was able to repair the laptop by baking the motherboard. See post here.
I grabbed this TV with the problem of the right half of the screen being dark. Though I suspected a backlight problem, research indicated a problem with the TAB bonds on the LCD panel.
The problem looks identical to this youtube video with a potential solution.
This suggests a loose TAB bond.
These next two videos show two different repairs of the TAB bond, one with a hot melt glue and the other with rubber shims.
So after watching these videos and with my previous attempt, I figured I was properly prepared to fix this TV.
First step was to remove the stand and the screws holding it in place. Next was to remove all the screws for the back cover. I needed to remove the front plastic bezel to access the front of the panel behind it . Working around the TV, I had to remove the speakers from the bottom, the front LED board and steel supports holding the panel to the front plastic frame. With the plastic bezel removed, I flipped it over and removed all the front screws holding the front steel bezel in place that held the LCD panel. There was conductive tape on the top that had to be peeled off.
With the front bezel removed, I plugged it in and powered it up and started poking at the rightmost TAB bond with a plastic pen. This seem to fix the screen. I poked at the other bonds to see if other bonds were flaky and some produced lines on the screen when touched. The far right bond tab was the main culprit of the dark right half picture and verified the results in the youtube videos.
I made a shim for that connector with some draft insulation and put the bezel back in place since the bezel is required to push down on it. Powering the TV back on, it appeared there wasn’t enough pressure since the darkness came back. I removed the bezel again with the TV on and then vertical lines started to appear on the far left side of the TV. I probably screwed up and shorted the circuit board on the left top of the panel. I should have shut the TV off before removing the bezel again since the panel appears damaged and removing the bezel was the only thing I did to create the lines. I also noticed that the long circuit board had two conductive bumpers probably to ground the boards and to keep the circuits from touching the bare metal inside of the bezel. I would have needed a much thicker shim in order to create more pressure on the TAB bond.
I figured the panel was probably damaged and I should try to put the TV together as an exercise and practise.
For the front metal bezel, the panel was set in a plastic frame so I didn’t have to worry about the LCD panel being in the correct position. I also made sure to hand tighten the front screws in order not to crack the LCD panel.
When I got around to attach a metal support piece at the bottom of the TV, I couldn’t figure how it got there in the first place and not sure of where to put the screws. It didn’t really matter since the TV was trashed but the lesson here is to take lots of pictures and maybe mark screws and locations with nail polish or tape. I ended up not putting back the metal support nor the screws in that section.
So here are the lessons from this attempted repair
Repairs are not as simple as shown on youtube.
Turn off the TV to minimize chances of shorting a board
TVs with vertical lines could have non-repairable LCD panels. Easiest repairs will be a TV that won’t turn on with the most likely cause being bad caps.
If opening up your TV, take lots of pictures. Mark screw locations with masking tape or nail polish.
If removing a front bezel to access TAB connectors, be super careful. Hand tighten screws just lightly or you will crack your LCD panel. It may also be better to do this with the TV powered up since you will be able to see if the screw is too tight since it will start affecting the picture.
I came across a free, broken 32″ Zenith model Z32LCD4-UK. An attempted repair was made before since the power supply board was already pulled out of the tv. Inspection of the board showed several obvious blown capacitors which were bulged up on the top. The values I needed were 2 x 3300uF/10V and 2 x 680uF/35V. Once they were replaced, the TV powered up with no issues.
I picked up a 39″ Sanyo FVM3982 that had an issue with the picture going out a couple seconds after initally turning on.
After removing the back panel, I checked for bad capacitors but there weren’t any. When I powered it up again, it started working so I closed it up and left it on for a couple of hours. The old adage “problems that go away by themselves come back by themselves” applied here and the next time I tried to turn it on, the problem came back.
Trying to identify the symptom better, it appeared that the backlight was shutting off. This was confirmed by shining a flashlight on the screen to see if the screen image was visible.
I wanted to get a look at the inverter boards which power the backlight but for this model of TV, it would involve taking apart the panel which is held in a steel frame with a bezel that holds the thin and fragile LCD panel in place.
The LCD panel is enclosed by the steel frame. On this TV, there was no internal plastic frame to keep the panel in place.
When I reassembled the bezel, I ended up cracking the perfectly good LCD panel since it wasn’t perfectly centered and my power drill overtightened the screws. I should have been more careful and only tightened the screws by hand. Leaving the TV on while assembling the front bezel would also give me visual confirmation I wasn’t over-tightening the screws.
Update: Research after the fact indicates the power supply board typically has protection circuitry that shuts off the backlight if a problem is detected. Burnt out CCFL bulbs or bad transformers are typical culprits in this case. A burnt out bulb can be bypassed by removing and shorting the associated transformer with only a slight degradation to the backlight brightness. With this TV, the inverter board was suspect since the backlight did work intermittently. A replacement inverter board was about $14 USD.
When my Tivo died after many wears of use, I decided to research online to see if there was a fix and came upon the problem of capacitor plague. Electrolytic capacitors used predominantly on power supply boards in electronics have a high failure rate making this 10 cent part responsible for junking a high priced piece of equipment. There are websites devoted to this problem like badcaps.net and a class action lawsuit in the US against Samsung for TV failures in 2012.
With typical electronics failures, repair and troubleshooting require knowledge of how the circuit operates and test equipment including multimeters and oscilloscopes. However, with electrolytic capacitor failures, very little debugging is required since failed capacitors “pop” and bulge on the top making it simple to identify and replace. With a little bit of soldering and the replacement parts, it is easy to repair this type of failure.
Replacement capacitors in small quantities can be found on ebay. Some sellers will bundle capacitor kits for your model of TV (at a premium). Asian sellers have small quantities on ebay available for a couple of bucks though I find shipping takes anywhere from 2 to 8 weeks. In Vancouver, you can find small quantity capacitors at Lee’s Electronics or Main Electronics. RP Electronics may carry them as well but I haven’t shopped there recently. Digikey delivers to Canada and the US overnight but they have a $8 shipping charge for orders under $200.
When finding replacement caps, look for the brands Rubycon, Nichicon, Samxon and Panasonic. The value (typically in uF) is what you need to match as well as the voltage rating. You can use a higher voltage than you currently have (which may also decrease the chance of a future failure) but the uF needs to match exactly. There are also two case styles: radial (most common) and axial (connections on both ends like a car axle).
When installing capacitors, make note of the polarity. The negative terminal is typically marked on the board and also on the capacitor with a vertical stripe. An electrolytic capacitor installed backwards will not work.
Soldering Tips
Get your soldering iron hot and clean it with a damp (not wet), dense sponge. Clean the tip again once it gets dirty with burnt flux or if there is too much solder. Apply a tiny bit of solder to the tip since a “wet” tip will improve heat transfer. Touch the tip to the joint and add more solder to the joint once it gets hot enough. Use the heat of the joint to melt the solder and NOT the iron tip. This will ensure a good connection. Areas with large ground planes may take a bit longer to heat up but be careful not to apply too much heat since this could lift up and damage the pad. A good solder joint has the solder evenly flowed around it and is not balled up. Solder may contain flux which is an acid that cleans the area to ensure good adhesion. You can also buy flux pens if a small amount is needed. Once the joint is cooled, you can clean the dirt left by the flux with a qtip dipped in rubbing alcohol. Wash your hands after soldering since solder may contain lead. Eye protection is also important since solder could flick into your eyes, especially when soldering wires.
To remove an electrolytic cap, apply excess solder to the two joints and then alternate your iron back and forth between the two while gently tugging at the body of the cap. Once the capacitor is out, remove the excess solder with desoldering wick.
My parents gave me their remote that wasn’t working after the grandkids dropped it on the hardwood floor. Taking it apart and checking for broken connections, everything was intact. A little research online indicated the 455khz ceramic resonators used for timing are susceptible to shock and was a likely culprit for drop damage. I checked the local electronics stores but they didn’t carry the part so I ordered 5 pieces on ebay from Asia for $1 (includes shipping). Getting impatient, I then decided to head to the recycling center and ended up finding an older but brand new remote for a camcorder that I was able to salvage the resonator from. The replaced resonator fixed the remote and the resonators I ordered eventually did arrived 8 weeks later.
A good way to help debug problems with remotes is to use a digital camera (smartphone or tablet works as well) to view the pulses coming from the IR LED to confirm your remote is working. Another technique is to use an analog multimeter to see the pulses while probing the voltage at the LED if you don’t have an oscilloscope.
For maintenance, I regularly take remotes apart to clean them since they collect a lot of gunk from sticky fingers. The circuit board gets cleaned with rubbing alcohol while the the plastic case and rubber keypad gets a bath is hot soapy water. Dry it completely before reassembling. Don’t wash the circuit board!!
With the free upgrade and glowing reviews of Windows 10, I decided to update my home theatre PC (HTPC) computer. This PC had a tricky setup since I am running with a single 3TB hard drive which requires a motherboard with UEFI compatible BIOS to boot with this large of a drive.
One of the major criticisms of Windows 10 is the loss of privacy and that using the express settings collects and sends data to Microsoft. There are a few websites that go through these settings and indicate how they should be set to protect your privacy. Here is one.
After running Windows 10 for a few days, I was getting annoying blue screen errors probably caused by driver conflicts. I decided it was easier just to rollback to Windows 7 since you could do this within a month of the free upgrade.
I then found that some of the privacy intrusions introduced in Windows 10 were being added to Windows 7 and 8.1 through Windows Update. Luckily, these updates could be uninstalled. One article here. Updates that should be uninstalled include KB3075249, KB3080149, KB3068708/KB3022395.
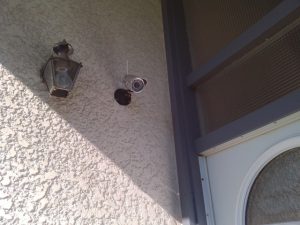
I’ve always wanted a security camera at my front door to avoid answering my door for gas marketeers, mormon and jehovah witness missionaries, and process servers for photo radar tickets. I purchased a dBPower VA039K on ebay for $40 USD which is similar to models offered by Foscam and Wansview.
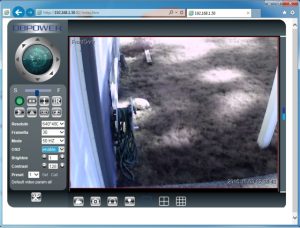
Initial connection needs to be wired ethernet to configure the wireless and this can be done through a web interface. You should assign the camera a static IP address (check your router for ranges of valid addresses). On my router, the default starting number for the last octet in the IP address is 100 for DHCP. 2-99 could be used for static addresses.
One important setup tip is to change the default password. There are websites that broadcast IP camera videos from unsecured cameras that haven’t changed from their default passwords. Check out insecam.org
There is a CD provided with some apps including one to find your camera’s IP address. In order to view video from your browser, you need to install another app as well. With a Android tablet or smartphone, there is an app on the CD. The app is APCamera and available on the Google Play Store.
If you want to be able to view your camera from outside your local network, there are instructions to set up DDNS (Dynamic DNS).
I installed the camera high up by my front door and drilled a hole to pass the wire. Since the wire was permanently connected to the camera and had a fairly large dongle for ethernet, I had to cut it to pass the wire through the wall. I reattached only the power and ground wires to the AC adapter plugged in to the other side of the wall since I no longer needed the wired ethernet after initial setup.
The camera has software motion sensitivity and I set it up to email a picture on detection. Experimenting with the sensitivity, I found the lowest setting worked the best in not producing too many false triggers. It does trigger on shadows however.
The color reproduction is a bit off for the camera but it does the job for the price. It also features IR illumination for night time.
I contacted my ISP complaining of slow speeds with my internet connection. I ran the test at speedtest.net and got 20Mbps download and 0.04Mbps upload. The support representative at my ISP suggested I plug my PC into the modem directly bypassing my router and to run the test again. The results this time were 100Mbps download and 10Mbps upload. Guess I couldn’t blame my ISP for the slow speeds.
Searching some Linksys forums showed others with the same router (Linksy E900) had slow traffic issues. I checked if there was any newer firmware than my 2013 version and I found a Jan 2015 version 1.06 which can be downloaded from here. I updated the firmware but had trouble connecting to my modem afterward so did a factory reset by holding down reset button for 10 seconds. This update seemed to do the trick and brought my speeds pretty close to what was achievable. Hopefully the new firmware will be a bit more stable since I did lose connections once in awhile before (requiring me to unplug the router to reset it). One change in the updated firmware that affected me was the inability to use a network name starting with a number which was allowed before. Since I had to change my network name, I had to reconfigure all my devices connected to it.
If you are in the US, you can take advantage of Google voice for a free VOIP number. Canadian numbers are currently not supported. Though ISPs, Vonage, MagicJack and Comwave are some more well known options, I use Vitelity. They are more focused towards wholesalers and resellers but don’t turn away single customers.
You can use a softphone on your smartphone (I use Zoiper), PC app (I’ve used X-Lite previously on a laptop) or an Analog Telephone Adapter (ATA) to connect to standalone phone. I use a Sipura/Linksys SPA1001.
I was paying $2.75 US per month for a Canadian local phone number (Direct Inward Dial DID) and get free voice mail (recorded in WAV format and emailed to me and also transcribed to text), free caller ID, and SMS support (I use the Xabber app on my tablet, approx 5 cents/msg). While preparing this blog post, I noted their posted rate is now $1.49/month. I contacted them and should now be charged the lower rate.
Calls are 1.4 cents per minute for North America and they have an unlimited plan for $8/month.
They have setup instruction for a few devices on their website though it may not be easy for those that aren’t technically inclined.
Some issues and tips
My SPA1001 has only one telephone port. I thought I would be able to split it to two phones like a regular phone line but it doesn’t seem to have enough drive to do this. If you want to use two phones, find an adapter with two ports. I also had to update the firmware so that I could modify the daylight savings time dates that were changed in 2005. I updated to version 3.1.19(SE) which allowed me to change the Daylight Savings Rule (under Advanced->Regional) to start=3/2/7;end=11/1/7;save=1
You can improve voice quality by making sure your router prioritizes voice packets. This can typically be set in the QoS (Quality of Service) settings.
I had problems once when I replace my modem with a D-Link DIR-601. I had to return it since it seemed to be blocking VOIP traffic. No issues with my current Linksys E900.
Vitelity lets you create sub accounts for multiple devices. I created separate sub accounts for my ATA and smartphone app. You can set your DID to ring the sub accounts you want.
I’ve had issues dialing 1-800 numbers with the message “The number is not available from your calling area”. I’ve had to open two trouble tickets but I think this is finally solved. I can also use Google Voice for outgoing calls if this happens again.
For SMS, vitelity was recommending an app called S.MS but it is no longer at the Google Play store. Since it uses a standard XMPP protocol, I used Xabber instead. There is a weird error when I start where it says “No Contacts” but if I go into the menu and select my account, it is fine.