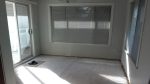
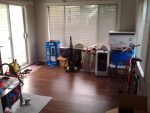
Browsing Home Depot, I found some 12mm laminate flooring for $1/sq ft. This was a good deal since thick flooring is better and usually more expensive. Though my upstairs needs new flooring, I didn’t want a patchwork of different flooring styles but will probably stick with carpet in the living areas and use plank vinyl in the bathroom and kitchen. The upstairs addition is carpeted and gets dirty from the sliding door entry and I’ve also used the room as a work space. I bought enough laminate to cover the addition, the foyer and stairs.
In the addition, I considered leaving the baseboards up but the correct thing to do was to remove and reinstall them. At my parents, “professional” installers left the baseboards and then added quarter round moulding to cover the gap leaving a less finished look.
I borrowed a portable table saw, a chop saw and a laminate cutter. The cutter was probably meant for thinner laminate since the cuts weren’t very clean with 12mm laminate so I didn’t use it. When sawing, the good side should be UP when using the table saw or chop saw to minimize chipping the surface.
Next I had to decide if I wanted to use underlay. Since I was installing on plywood, it wasn’t really necessary but would give the floors a softer feel. I picked some up at Rona.
With the carpet up, I notice quite a draft coming from one outside wall by the floor. I noticed the entire wall had been shimmed up about 1/4″ causing a major draft. I didn’t have any expanding foam insulation so just used a large amount of caulk to try to seal the air leakage.
Back to the flooring. For the first row, the tongue on the plank needs to be ripped off. The thickness of the last row also needs to be estimated at this time since you don’t want a 1″ sliver on your last row. A gap needs to be maintained on the edges to allow for expansion which would be covered by the baseboard.
The instructions indicate joints must be more than 6″ apart so the trick is to stagger the rows while minimizing waste. I’ve seen installations where the joints on every other row line up and it doesn’t look very natural so I wanted a fairly random stagger pattern.
For the last row, you should measure the thickness at both ends of the plank since the area may not be perfectly square. I had to redo one plank because of this problem.
Also, I needed to cut around a door jamb to slide the laminate underneath. A borrowed oscillating saw was the perfect tool to make the cut.
With the floor installed, I replaced the molding and caulked the gaps but didn’t realize I had accidentally purchased clear caulk instead of white since it only dries clear. Just a minor mistake.
In the entryway, I first removed the existing tile which had been laid on the original vinyl floor. I contemplated ripping up the vinyl but decided against it. In the entry way, you do have to worry about the laminate getting wet since water could damage it so I had some tile carpet that I used to rest shoes on.
For the stairs, hardwood nosing would cost about $10 a step while the whole step could be replaced for $30 so I decided against using laminate on the steps. Replacing the steps will be another future project.