My parents house built in the 70s has aluminum wiring and lights and outlets had been updated previously without consideration for the compatibility of fixtures with aluminum. Though aluminum wiring can still be used, there is increased fire risk due to contact with dissimilar metals. In preparation for an electrical inspection required by the home insurance company, I updated previously changed outlets and switches.
My initial updating involved adding copper pigtails to Decora styles (non-aluminum compatible) switches and outlest using Alumiconn terminals. These are pretty expensive at around $5 a connector and required three per outlet (hot, neutral, and ground). The box will get a little crowded adding these and they also needed to be screwed fairly tightly. The connectors have anti-oxidation gel inside the connectors.
After pigtailing most of the outlets, I found out that they still manufacture aluminum compatible switches and outlets available at both Home Depot and Lowes. Though they cost 3x more than a standard copper outlet, it is still less expensive than 3 alumiconn connectors and less work to replace.
Previously, #63 marette connectors with anti-ox (oxgard) was used for aluminum to copper connections and both are still available. Ideal Aluminum to Copper connectors (purple cap) are also available at Home Depot Canada and come prefilled with anti-ox inside the cap.
I had found a burnt terminal on a non-aluminum compatible outlet installed to aluminum wiring used by a toaster oven in the kitchen plus a burnt aluminum to copper splice (incorrect wire cap and no ox-gard).
In hindsight, I would have done the following to minimize both cost and effort.
Replace all non-aluminum compatible switches and outlets with aluminum compatible.
For lighting fixtures, use pigtails with #63 marettes and ox-guard or Ideal Al/Cu wirecaps
For splices, use Alumiconn connectors or Ideal Al/Cu wirecaps
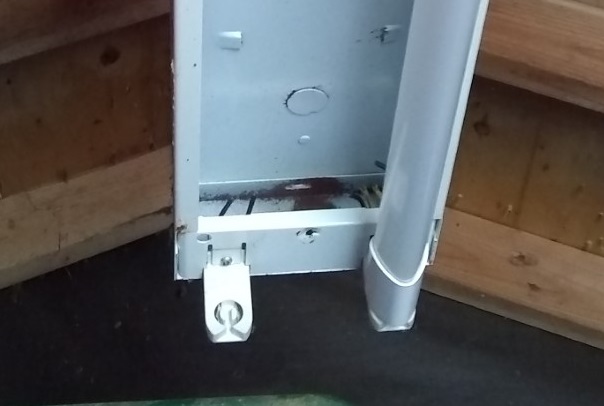
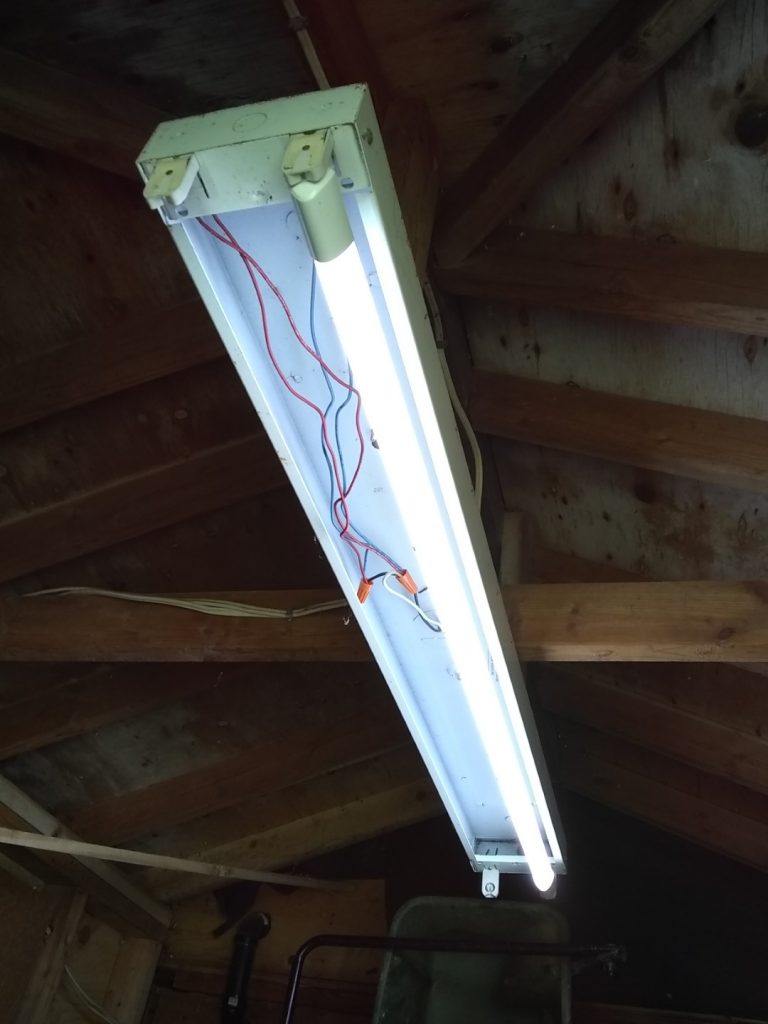
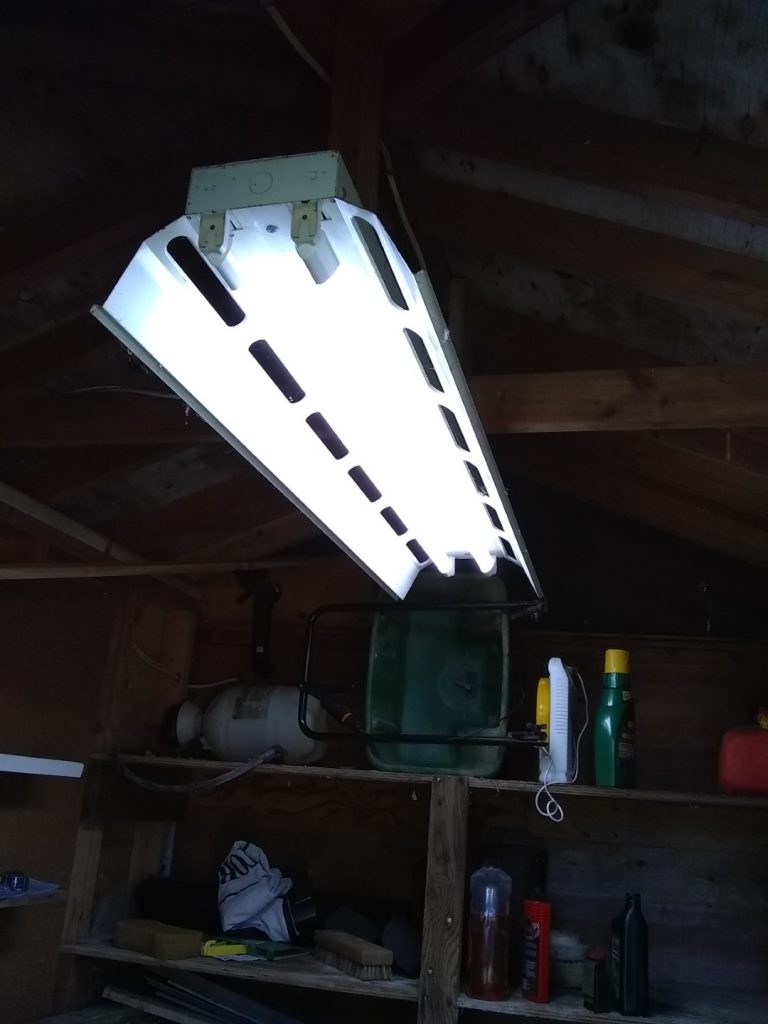
My shed fluorescent tube light has always been problematic because the bulbs don’t work well in low temperatures. With most of my home lighting replaced with LED, I found ballast-free LED bulbs at Home Depot from Toggled. They need to be ordered online but can be picked up for free at the store.
Checking the video, the bulbs are directly wired to the AC so the ballast can be removed. There is a small issue if your lamp holders are shunted (shorted together at the lamp holder end). Instant-start ballasts are likely to be shunted. If they are, they include replacement non shunted holders.
After ordering, they took about a week to arrive. Bulbs are fairly light since they are plastic. Installation was very easy. You only need to supply AC to one end of the lamp holder. The opposite side is not used so the wires can be cut at that end.
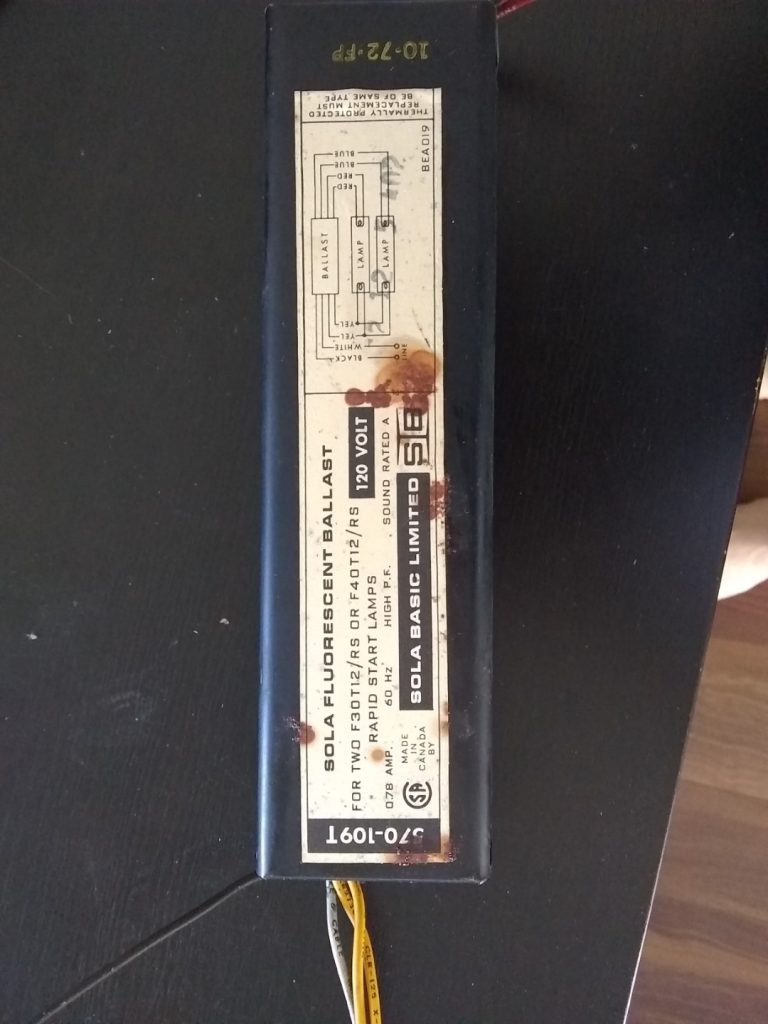
Disposing of the old ballast gets a bit tricky. Older ballasts can contain PCBs which are considered hazardous waste. To determine if your ballast contains PCB. Check this link. Mine had a 1972 date code and ballasts manufactured earlier than 1980 are likely to contain PCBs.
For disposal, I tried to follow the instruction in this link for BC residents. I had trouble registering as a hazardous waste generator and emailed productcare recycling. I was told I didn’t need to register for 2 or less ballasts and they would mail me a box to ship it for disposal. I also had another option to take it to the facility at Tilbury but would need to make an appointment.
Update: A courier in a 5 ton truck delivered an empty box and a waybill. I packaged the ballast in the heavy duty Ziploc bag provided and had to call the courier back to pick it up. They do make things way more complicated and inefficient than needed.
keywords: fluorescent ballast disposal Vancouver BC
After my battery ran out on my Ryobi drill, I decided I should get a second spare to swap out. I had purchase a kit including drill, circular saw and flashlight many years ago and it has been reliable though not heavily used. When using the saw, I have to constantly swap the single battery with the drill so another reason to get a second one.
Genuine and new batteries are pretty expensive. There are many third party and refurbished batteries available on ebay.
My drill uses battery model P103 (28WH, 1500maH – some are 24WH, 1300mAH). I found a seller selling refurbished P102 (24WH, 1300maH) and P107 on ebay (28WH, 1500maH). I assuming they install new cells into old cases. I ordered a P102 for around $20 USD and will update once I get it in and test it for a bit. Lithium batteries can pose a fire hazard so I am wary with third party versions. They also can only be shipped surface mail.
I’ve had decorative motion exterior lights for awhile and currently on my second set of three. The second out of three just stopped working and I wanted to wait until the third one dies before replacing all of them. I had installed switch protectors on the light switches. See here.
To convert to a normal light, you need to access the wires going directly to the bulb socket. You need to remove the control module to get access to the wires. The module is held inside the fixture by two hollow rivets where the screws slide through to mount the light. You just need to drill the tops out and you can pull the rivet and release the assembly.
There are four wires coming from the socket section – a multiwire control from the sensor, black wire (hot from bulb), white wire (neutral from bulb) and bare copper ground. I cut the control wire and all wires from the module and connected directly to the black and white. I then replaced the control module and rivets.
Remounting the light will give you a normal light. I should have done this to the first one that failed instead of throwing it out and replacing with a basic jelly jar light.
Some Heath-Zenith models have a recall so check the model number before throwing it out.
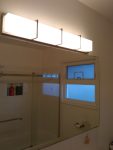
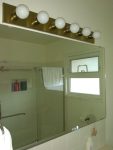
As part of my slow remodel of my main bathroom, the Broadway style vanity light was next to go. I was down to three out of six globe bulbs and didn’t want to waste money on replacement bulbs.
I had found the Artika Subway LED Vanity Light at Costco last year and it has been replaced this year by a smaller and brighter light from a different manufacturer (Celeste from Innova Lighting, 2700 lumens). The electrical box in my bathroom is offset from the center of the mirror and vanity so I needed a light that would cover it and not look odd.
I initially ordered a Mirrea 16W LED vanity light from Amazon.ca but it wasn’t bright enough. 16W is equivalent to a 60W incandescent bulb.
I found the Artika Subway at Costco.com It is specified to be 1700 lumens which is equivalent to about 110W incandescent.
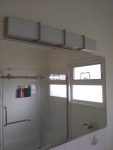
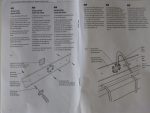
When it arrived, I plugged it in temporarily to check the brightness and it seemed adequate. The fixture is also glass so a bit heavy. It came with a 24″ mounting plate where I drilled extra holes to feed the wire from the box which in my situation is offset from the center. I also drilled extra holes so I could mount directly to the studs instead of using the included hollow wall anchors.
With it installed, it is more than bright enough for a small bathroom and almost covered the old light completely. If it ever dies, it is going to be a pain to replace the entire unit.
I am finding these lights a bit too bright (especially late at night) so I am going to replace the wall switch with a dimmer. The costco.com website indicates these lights are dimmable.
Update: I emailed Artika and they sent me a list of compatible dimmers. I picked up the Leviton 6674 at Home Depot and they dimmed with no issues. Here is the list
Leviton Decora 6674|
Leviton Decora 6631-P
Lutron Toggler TGCL-153P
Cooper AAL06
Cooper SAL06P
As part of my basement reno, I needed a solution for the bathroom door that swung inside a small bathroom. With the limited space, a pocket door would be ideal but would require reframing the opening.
I found a solution in the Johnson 2610F Wall Mount rail kit which converts any door into a externally mounted sliding door. I bought the 7ft version on Ebay . The longer length can be cut down with a hacksaw.
The important dimension is the door should be at least 1-1/4″ wider than the opening. I used the existing door though it is a little bit too narrow which meant the door could come off the bottom plastic guide when closed. The length of the track should be at least double the width of the door.
Installation is pretty straight forward and they have a video on youtube.
I was able to get inset handles that fit the existing knob holes and i plugged the latch hole with a cut piece of wooden broom handle. The hinge mortises I filled with cut ends of a 2×4 which was close to the hinge dimension.
Since I have fairly thick molding around the door, there was a bit of a gap between the door and the frame so I added weatherstripping to the inside frame.
For a privacy lock, I installed a sliding latch on the inside frame with the bolt extending into the door when closed. In an emergency, the door could be opened by removing the screws in the plastic guide rail at the bottom and tilting the bottom of the door out.
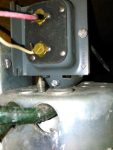
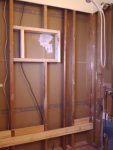
During the reno of my basement, I heard a loud buzzing coming from a bedroom and I suspected it was the doorbell transformer. Since they are typically mounted to an electrical box for AC power, I disassembled the ceiling light and found two wires coming from a knockout on the top of the ceiling box. I disconnected the wires and the buzzing stopped but my front door bell was also dead. I determined I would have to cut out the drywall to repair or replace the transformer and since I planned on painting the ceiling, there wasn’t a reason not to fix it. Cutting a hole large enough to access, I took a pic with my cell phone to determine how the transformer was mounted. A screw was expanding a collar connecting the bottom of the transformer to the ceiling box. Once I had the transformer out, I could see the problem. It looked like when it was originally installed, it was missing a rivet at the top holding the plates together. The installer just put a nail into the hole and bent it to hold it together. I headed to Home Depot to buy a bulk nut and bolt for around $1, fixed the transformer, reinstalled it, and patched the ceiling.
Mounted transformer – you can see the nail on the right side
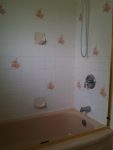
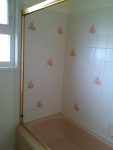
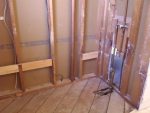
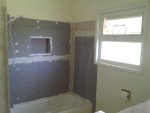
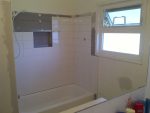
My brown 60’s bathtub was in need of a replacement. The problem I had was mainly the colour of the tub and some rust on the outside lip. The grout had a bit of mildew in spots and I was worried it was coming from behind the wall. The ugly floral tiles and seashell soap holder tile also needed to come down.
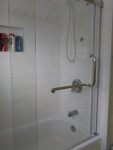
I had replaced the shower valve with a pressure balanced one previously (no more blasts of hot water when someone turned on a faucet or flushed a toilet. See post here. The next step was to replace the bathtub (before the floor and vanity).
To minimize plumbing, I wanted a replacement bathtub close to the height and drain location close to my existing tub. Most tubs carried in big box stores are “above floor drain”. These tubs are higher to allow the drain pipe to run above the floor where the floor can’t be cut out such as in concrete condos. The only model I could find close to my original tub was the Bootz Aloha carried at Home Depot in the US. The Canadian version was an above floor model. Thinking I would need to rent or borrow a truck to bring it back, I measured the box and determined it would just fit into my hatchback so my first hurdle was solved.
I had looked into bathtub reglazing and research indicated it only lasts about 5 yrs. I did find an epoxy painting product but for both, the cost would almost be the same as a new tub.
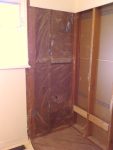
The next design challenge was choosing a backerboard. The best and most economical solution I found was Densshield which is a drywall product coated with a waterproof layer. I did my research and read and watched a few installation videos on youtube.
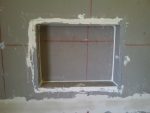
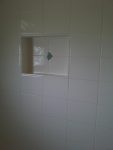
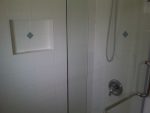
One feature I did want to add was a shower niche. I looked at buying a pre-built niche and ended up building one with 2×4’s and densshield.
With densshield, the face is waterproof but the edges are not. In their videos and instructions, they recommend using polyurethane sealant or silicone to seal joints. I picked up Sikaflex sealant from Home Depot for this application since thinset would more easily adhere to this.
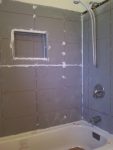
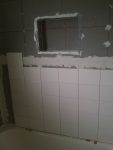
For the tiles, I wanted something that wouldn’t look dated in 10 yrs. Though larger tiles are more modern, subway tiles tend to be timeless. I settled on 6×8 tiles and 2×2 green glass tiles inset in a diamond pattern for a small design feature. I purchased these at Lowes since they are sold individually there.
Step 1 – Demolition
My friend came over to give me a hand with the demo and tub installation. Hammering out the tile, the area behind the tub was dry and mold free.
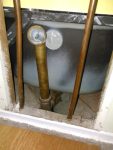
To remove the tub, the drain had to be unscrewed out. I had purchased a drain wrench but it wasn’t really needed and a pair of slip-joint pliers could be used by sticking the pliers inside the drain.
With the tub removed, there was a bit of a time capsule in garbage the original installers left inside the old tub cavity. There was an old pepsi bottle, boxes from some of the bathroom accessories and leftover mosaic tile from the original walls. I considered using some of the original tiles in my design but couldn’t really fit it in.
I took the old 60lb steel tub to the metal recyclers and got a whopping $2 for it.
Step 2 – Tub Installation
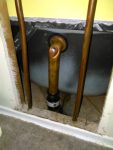
The drain pipes in my 60’s house were 1-1/2″ copper using compression fittings for the tub drain. When we dry fit the tub, the drain location was about 1/2″ off and we were able to line it up by angling the drain pipe. The overflow pipe was too long so I cut it down and used a Fernco fitting to reattach it which also gave it some play to line up properly. The shower valve also no longer lined up to the center of the new tub but it could easily be moved since the copper pipes have a bit of play when not attached to the framing.
When I replaced the drain, I didn’t tighten it enough nor did I check it adequately for leaks so I had to replace some wet drywall on the ceiling downstairs.
There is a good youtube video on installing the Bootz tub from the manufacturer though they don’t recommend any product names.
Step 3 – Framing the niche
With 6×8 tile, I wanted the niche to fit four of these inside so I made the niche 12×16 which could hold several soap and shampoo bottles. A minor problem arose since an electrical cable ran in the area where the niche was going to be built. Luckily, there was enough slack in the wire after some clips were removed for the wire to go around the niche. I had to be careful with the measurements since I wanted a full tile at the bottom edge of the niche and it had to be centered.
Step 4 – Installing the Densshield
I picked up the Densshield at Lowes and it comes in 60″ x 32″ sheets which is perfect for surrounding a 5ft tub. However, I needed a little bit extra for the sides of the niche and the area beside the bottom of a tub. You should get a 4″ x 32″ strip left over with the two sheets on the main wall. Instead of buying and wasting an extra sheet, I cut strips from the top of the sheet opposite the shower head. This area would be the driest and would rarely be in contact with water.
One question was how to install the Densshield over the bathtub lip. I left a 1/8″ gap (spaced with a nail) and also used 2×4 blocking where possible to give both the lip and Densshield and edge. In hindsight, I should have used a minimal gap like 1/16″ since it is hard to fill a larger gap with the sealant.
For screws, a box of 200 1-1/4″ Rock-On backerboard screws was enough for this project. Screws were set every 6″ following the instructions since it has to hold a lot of weight with the tile.
I put Sikaflex between the butted joint on the wall, the inside corner joints, over the screw heads, and the exposed edge of the Densshield along the bathtub lip. I also sealed all the pipe openings and the edges when I lined the niche with Densshield. There are youtube videos where they use a paint-on waterproofing membrane like Aquadefense or Redguard on the edges but those are not available in small quantities and Sikaflex should work just as good. The Sikaflex does take a couple days to cure so I covered the walls with dollar store shower curtains since I needed to use the shower while it dried.
After it was dry, I reinforced the joints with cement board tape and modified thinset.
There is also a good youtube video from the makers of Densshield on the installation process.
Step 5 – Tiling
My existing tile wall is about 64″ high above the tub. With 6×8 tile, I would need 10 and half rows of tile. I had used the following:
4 sheets 5′ x 32″ Densshield (Lowes)
Pack of 200 1 1/4″ Rock-On cement board screws
2 tubes of Sikaflex polyurethane sealant (Home Depot)
Fibatape cement board tape
140 pieces 6×8 tile (Lowes sold by piece)
20 pieces 6×6 tile (Lowes sold by piece)
4 – 2″ x 2″ green glass tile (Home Depot)
50lb modified thinset (I had about 5 lbs left over)
2 – 1lb unsanded grout (I had a leftover tub)
PVC 5/16″ edge trim (Schluter BW80)
1/4″ x 1/4″ notched trowel
budget grout float
mixer paddle attachment for drill (didn’t buy one but it would have been much easier than mixing thinset by hand) (Harbor Freight?)
The tile count is for 10 rows x 4 for each side wall and x 6 for the front wall with the ends using 6×6 tile. The 10 rows didn’t quite reach the old tile height so I added a row of tiles cut in half so I needed an additional 7 – 6×8 and 2 – 6×6.
I got lucky and found a used tile saw on craigslist for $20. I did want to buy a used one since I wanted to take my time and not be rushed with a rental saw.
For a decorative feature, I bought some square 2″ glass tiles and would embed these in a few corners in a diamond pattern.
The first row is the most important and needs to be level. Don’t count on your tub being level. You do want the widest gap to be minimal since it has to be covered with a bead of caulking.
I had originally bought tile adhesive which had indicated it was good for wet areas. After some online research, I returned it and switched to using modified thinset.
For caulking, it is recommended to use 100% silicone with mildew protection for bathrooms. I used GE Silicon II which has a short handling time.
I took my time and tiled over several days. For spacing, I used the nubs built into the tile instead of tile spacers. With both the densshield and sikaflex, I knew my walls were waterproof behind the tile.
To cut the tile for the openings, I used both a circular tile cutter I purchased at Harbor Freight and the tile saw. Since the wall was not perfectly plumb, I did a lot more tile cutting than I had originally planned.
Step 6 – Grouting
I had some leftover grout and the online MAPEI grout calculator indicated I should have enough with an extra 1 lb.
Grouting is pretty basic but a little tedious so I worked in sections. I also wanted to make sure the colour matched my tile when it dried.
I did contemplate sealing the grout but didn’t do this extra step.
Step 7 – New Shower Door
One thing I didn’t want was an ugly shower curtain with my new bathtub and tile walls. I was looking into a glass screen but found a modern, frameless sliding shower door at a local importer of Chinese made building products. The door is thick 8mm tempered glass but instructions were minimal other than an autocad drawing.
I installed the fixed glass panel first determining the position with the plastic guide that installed in the middle of the tub wall. Though the instructions were to screw it in place for an acrylic tub, I just siliconed it in place. From the position of the panel, I could mount the edge frame and screw it into the wall. Holes were easily drilled into the tile with a new masonry bit and some tape on the tile to minimize the bit from wandering.
With the fixed panel in place, I could then install the top rail since it is attached to the fixed glass panel. The allen key for set screws for the rail supports were not included but luckily I had a correct metric key in my tool box.
During my update of all my brass door hardware inside the house, I also updated my front door lock and deadbolt. Since I wanted to use my existing Weiser keys, I purchased a Weiser front entry knob and deadbolt with their Smartkey system. The Weiser brand is used in Canada while Kwikset is used in the US.
The first issue encountered was that the Weiser locks used thinner keys so my old keys could no longer be used. However, the Smartkey was very easy rekey both locks to match my new keys.
Second issue was that when I went to Home Depot to get some more duplicate keys, they didn’t work. Comparing the new and original keys, they did appear to match. I ended up taking both the lock and keys back to Home Depot to get them re-cut and the new ones worked fine.
For the entry knob, my old lock had a push and turn system which made it very easy to both lock and unlock. The new knob used a small round turn switch which was relatively more difficult to both lock and unlock. The only advantage of this switch is the ability to lock the knob from the outside with the key. In both designs, you can lock the door without a key (which is required with the deadbolt).
After my update, I did find out there are vulnerabilities with the Smartkey system. They can be opened with a special tool fairly easily. You can find articles and videos on youtube if you search.
I am not really concerned because if someone wanted to break into your house, they would get in and I also have my monitored alarm system.
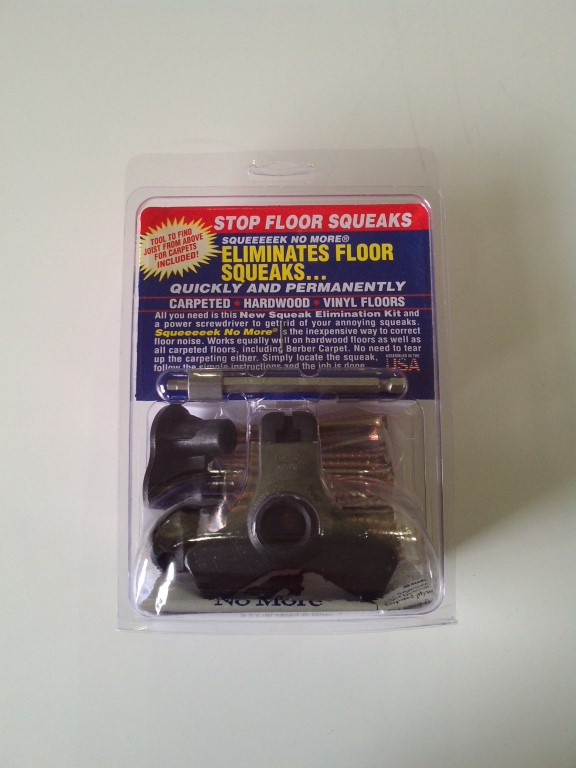
Floors squeak due to floor boards that are nailed to joists becoming loose over time. Newer construction techniques use glue and screws to minimize squeaking. After watching “Ask This Old House”, they featured a repair system with a depth guide and screws with break-away heads called “Squeeeeek-No-More”. I picked this product up in Home Depot in the US for $20 in the carpet section of the store.
The hardest part of the repair is finding the joists. The instruction manual suggests going 9″ over from a wall and assume that joists typically run in the direction of the shorter length of a rectangular floor plan on 16″ centers. The kit includes a special screw with a hex head and long straight shank to help locate joists.
My subfloor is constructed with diagonal 1″x 6″? boards with plywood on top (original wood floors removed) and then underlayment and pile carpet.
I found it pretty hard to find the joists and initially the joist was running the opposite angle I had assumed. Even after locating the joist (the screw will stop spinning), the squeaks were improved but not eliminated. I found with pile carpet, I could use trimhead 3″ screws instead of the Squeeeeek-No-More screws.
I will be returning the system and have given up on fixing the squeaks until I replace the carpet.