My Asus Zenpad Z300M had been giving me problems the last couple of months after a system update. I would get com.process.media has stopped working errors on reboot, gmail and the play store would crash constantly, downloads and screenshots would fail, updates were always pending and I would get low storage error messages. I had to delete apps to gain space though I have plenty of storage.
After waiting for a new system update that never came, I was close to doing a factory reset. I then figured out that the system media storage app was using over 7GB of storage. To clear it, go to Settings->Apps and click on the 3 vertical dots in the upper right corner (more options) and select Show System. Scroll down and select Media Storage and then Clear Data. You can clear the cache as well.
I’ve been able to move most of my apps fairly easily when updating Android tablets or smartphones but a couple of King Games have issues. For Bubble Witch Saga 2 and Candy Crush Soda Saga, you can save your progress by connecting to Facebook but you end up loosing all your boosters. The only way to keep your boosters is to back up application data with the Helium app.
Connecting with the Helium app has always been tricky. You have to make sure you have the correct USB drivers. For my new Asus Z300M tablet, the initial drivers that were found indicated problems with MTP but when I let Windows update search for the latest drivers online, it appeared to find the latest ones. In device manager, the driver showed no errors but Helium still would not connect and would show “Waiting for Device” .
Under Device Manager, the tablet shows up as “ASUS Android Composite ADB Interface”.
After several attempts at switching between MTP and PTP modes and toggling USB debugging on and off, I decided to try to run adb.exe in command mode to see if my computer could talk to the tablet.
I opened up a command window (Start Menu->Search box->type cmd) and entered “adb devices” at the command prompt. The PC found the device and a window popped up on my tablet with “Allow USB Debugging? The computer’s RSA fingerprint is XX:XX:XX:XX:XX:XX:XX” Once I hit ok, Helium connected successfully.
If your drivers don’t report errors (not listed under the question mark in Device Manager), try this.
I have a problem where I needed dual USB jacks for charging up to two tablets. The area I need power doesn’t have an electrical outlet so I have run a two prong extension cord. You can buy electrical outlets these days with built in USB ports but this wasn’t an option in my situation.
There are a lot of dual port chargers on ebay but you do have to worry since most cheap chargers do not have UL safety certification. You need to pay more for a name brand product. You don’t want to start a fire to save a few bucks. Chargers are not created equal though they may look the same on the outside.
To charge the larger batteries of tablets, you need one that outputs 2-2.4A which is more that a standard PC USB port. Checking specifications, sometimes it’s not clear if on dual port chargers, both ports output that much current.
I was able to find the Blitzwolf BW-S3 at Banggood shipped from China decently priced. Their website indicates their products are safety certified though there is a chance of getting a counterfeit item. The charger arrived fairly quickly and is working well.
I had the micro usb jack on my android Asus ME301T tablet wear out and I replaced the connector unsuccessfully with the part ordered on ebay. While removing the motherboard, I broke the locking tab on one ribbon connector (yanked it instead of lifting up) and the new connector was flaky since I couldn’t get enough heat to solder down the ground tabs with my old soldering iron.
I eventually ended up finding a new motherboard on ebay and replaced it. Ever since, I have been worried about the micro usb breaking again. There is a lot of wear on the connector since it needs to plugged in at least twice a day or more. I have been using an extension cable and leaving the micro usb cable plugged in but was worried there could be more damage if it is dropped due to the weight of the tablet and stress on the small connector.
My fears became real when I dropped the tablet with the connector plugged in and the connection became flakey. Searching ebay for cables, I stumbled on magnetic adapters. They appear to be knockoffs of a kickstarter project, Znaps but there are other suppliers including Wsken and Volador which have good reviews. On Amazon.ca, I found a Onebook (probably a knockoff) cable with two plugs for $10 CAD shipped.
I decide to order a new tablet and was able to find the Asus Z300M on Amazon.com for $130 during Amazon Prime Days. I ordered a silicon case and a Wsken Mini2 magnetic cable to go along with it since the Onebook cable may take months to arrive. The cable included a plastic tool to pry out the adapter and a small velcro cable strap.
So far the Wsken cable seems pretty good. The plug is uni-directional and will catch about a centimeter away. No more fussing trying to align the plug and determine if it is the right direction. If the plug is reversed, the magnets will cause the plug to repel. There is also a small LED on the plug to indicate it is getting power. Retention is very good. This adapter should prevent wear on the plug and break away if the tablet is dropped when plugged in.
Update – After 5 months, the plug for the Wsken Mini 2 broke. I had the Onebook cable sitting around so switched to it.
The Onebook cable is a bit thinner and has a dual colour LED that changes from green to blue when charging. It is also completely reversible.
Update 2 – The onebook plug broke as well. Luckily I have a spare but it doesn’t seem like this model is carried by the Amazon seller anymore. I have a 3-pack of Netdot cables in my Amazon cart as a backup if this one breaks. Though it may seem fun playing with the plug magnetically snapping it to the cable, I am now gently letting them connect to get more longevity from the plug.
Update 3 (Apr 2021) – I had ordered a 3-pack on Gen2 Netdot cables on Amazon in 2018 and all three plugs have broken. The first one lasted a few years and the last one broke when my tablet fell charging and the magnet didn’t disconnect. I contacted Netdot and they are in Gen10 for their cables and didn’t have plugs for Gen 2 anymore. I found inexpensive Keysion cables on Aliexpress and ordered 2 cables ($1.99 each) and 6 plugs ($0.69) which should be good for a few years hopefully.
I ran into this problem after replacing the main board of my Asus ME301T tablet. I successfully installed TWRP but it couldn’t find my backups that I have saved on SD card. Being impatient, I just reinstalled Lollipop, all my apps and restored app data with the Helium app.
Researching this afterwards, I found this youtube video.
The problem is that TWRP creates a subfolder under BACKUPS based on the device’s serial number. By changing the main board, the serial numbers no longer match. The trick here is to do a new small backup (backup the cache only) which will create a new backup folder with the device’s new serial number. Write down the name of it, delete it and rename your old backup folder the same name. TWRP should now see your backup files. You can perform all these file operations using the file manager in TWRP.
The device’s serial number can also be found under Settings->About Tablet->Status
I am on a 100MB/month plan which I primarily use to check email but I had been getting large downloads happening in the background. Steps I did to limit the amount of data include the following:
Use the My Data Manager app. Though there is built-in data usage tracking within Lollipop, the app provides notifications and more detailed statistics.
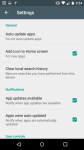
Configure Play Store to not auto-update apps. This option is set within the Play Store app. Menu bar icon -> Settings -> Auto-update apps. You can set it to update over wifi only as well but I turned it completely off.
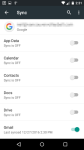
Disable sync settings for Google Accounts. This is under Settings (main) -> Accounts -> Google -> Your account name. I turned off sync for everything except Gmail. Android tends to install new google features which you will need to disable the sync for.
Optional. Restrict Background Data. I’m still unsure if gmail will be checked in the background if this is turned off. I have left it enabled but to disable it, go into Settings (main) -> Data Usage and it is hidden under the extended menu with the 3 dots in the top right corner. You will have a warning in your main notifications with it disabled.
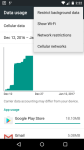
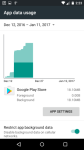
IMPORTANT. Turn off Google Play background data. This option was probably causing my large downloads. Go into Settings (main) -> Data Usage and find Google Play Store under App Usage. It needs to download some data first in order to be displayed in this list. Click on Google Play Store and you will have the option to Restrict app background data. Repeat this step for any other app that is downloading large amounts of data in the background.
My old Asus ME301T had been acting up lately. Its been running slow and all the cleaning and boosting apps didn’t really work so I contemplated reinstalling the OS. I had updated the stock Jellybean to Kitkat 4.4.2. See post here
I found a homemade Lollipop 5.1.1 ROM described here and that can be downloaded here. Steps for this upgrade are as follows (assuming you have TWRP installed). If you have game data you want to save, you can back it up and restore it with the Helium app.
Boot into recovery mode. An option may be presented if you hold down the power button to power down. Second option is to power off and then hold the vol down key and hit the power key. You should get recovery options. Select RCK with the vol up button (vol down will cycle through the choices.)
With TWRP recovery, I backed up my system and data (everything except cache) onto external SD card.
Move the download 5.1.1 zipped ROM image to the SD card. Download GAPPS for 5.1.1 You will need GAPPS to install Google Play Store so you can download Chrome and Gmail. I found a link here and downloaded the pico version for a minimal installation which only includes the Play Store. This should also minimize the google bloat with apps you don’t use and can’t uninstall without rooting your device. The pico version also does not include any sounds or wallpapers and you will need to download those separately.
Format the internal memory with TWRP. You can remove the external SD card to be extra safe.
Install the ROM Image and then GAPPS. Wipe the Dalvik and cache when asked.
Reboot and you should be running 5.1.1
Update: I actually reverted back to Kitkat since I couldn’t save my progress in a few King games I had. I had tried the Helium Backup app but it couldn’t connect to my tablet via USB. I just replaced the micro-USB connector since it was worn and decided to give Helium a second try since it may have been a bad USB connection. This time it worked so I restored the Lollipop install that I saved.
I have been running Lollipop for a few days and it’s like having a new tablet. No more slowdowns and sluggish performance.
Update 2: USB OTG doesn’t seem to work with this version. It was fine with Kitkat and I could plug in USB drives, keyboard or mice before.
My budget Huawei Y530 smartphone was starting to have trouble updating apps with insufficient storage errors. With only 512MB of RAM and 4 GB of storage, the built-in google apps get bigger with every update consuming what little space was available. See my review of the Huawei here.
My next budget phone was going to the Moto E (2nd gen). With Android Lollipop (5.x), 1GB of RAM and 8GB of storage, there should be much improvement over the Y530. I had seen it go on sale for $50 CAD during Boxing Day last year. Searching redflagdeals, it was on sale for the same price at Walmart several months ago and at Loblaws recently. The models sold for Canadian networks were North American versions that are easily unlocked with a code purchased online.
I searched Best Buy in the US and found the Moto E on sale for $30 USD (Boost Mobile-Sprint network). It had been on sale for as little as $10 on Black Friday. The wikipedia page indicates several LTE models with two of them specific for US carriers (XT1526 Sprint & XT1528 Verizon) This posting on redflagdeals indicated they should work in Canada. The guide below should also apply for the XT1528 though this version appears to be heavily locked down against rooting or other modifications.
Up for a challenge, I picked this up at the Bellingham Best Buy. When I got home and powered it up, it wanted to activate (but failed because it couldn’t see the network). It eventually timed out. I then connected to wifi and took all the system updates which brought the Android version to 5.1.
My SIM for Speakout was a standard size and the Moto E takes a micro SIM. I didn’t want to risk destroying my SIM by cutting it down and got a new SIM at 7-11 (normally $10 but current promo is free with $100 top up plus $25 credit). You can find punches on ebay for several bucks and smaller cell shops will cut them down for a small fee as well.
From the redflagdeals post, the XT1526 is not locked internationally but that model’s version of Android doesn’t let you change the network type from Sprint CDMA to GSM used by Speakout and most carriers worldwide. The Boost Moto E also has a SIM pre-installed in the phone. I should have pulled it out before initially powering on to avoid the activation process.
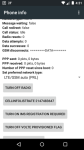
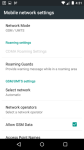
To change the band, you can either type *#*#4636#*#* into the dialer to get into the radio settings or download the “Network” app (black phone icon in white circle) which provides a shortcut to the same menu screen. Scroll down to the buttons and you will find a drop down to “Set preferred network type” and change it to “LTE/GSM auto prl”. Go back to exit and check the settings under Settings->Mobile Networks. Network mode should now indicate GSM/UMTS. Insert your SIM and under “Network operators” in the same menu, you should be able to search and select Speakout or Rogers from the list provided. For data, check if it is working and make sure “Allow GSM Data” is checked. If isn’t working, you can try to set the APN manually. I downloaded the “Change APN” app which is a shortcut to the APN menu and added the entries following this guide. It didn’t seem to take it but my data was working so not sure if it was automatically configured when I selected the network.
You should also turn off any Roaming Guard features since you are using this phone outside of the US and will get warnings every time you send a text. You can find this setting in Settings->More->Mobile Networks->Roaming Guards. Uncheck Call Guard, Data Guard and Outgoing SMS under GSM Roaming.
With the Moto E (2nd Gen), there are a few negatives.
No LED flash. If you need a flashlight, there are a few screen flashlight apps. I downloaded “Screen Flashlight”
There is an LED indicator but it only lights up if the battery is low and can’t be used by apps or for message waiting notification. The phone uses a feature called “Moto Display” which will show you both the time and icons for unread messages on the screen if the phone is moved when sleeping. Though this is a nice feature, I still prefer a flashing LED.
There is no data switch toggle on the quick settings panel on the top right. This functionality appears to be a change in Android Lollipop and not a restriction in the phone. Since I am on a limited data plan, I can’t have my phone downloading updates when I am on data. Luckily, I downloaded the “Data Usage” app which provides a shortcut to the data usage screen where the data can be toggled on and off.
No update to Android 6.x Marshmallow for US models. Non-US versions have gotten the update. One feature in 6.x is the ability to marry the external SD card to main storage so you don’t need to move apps to SD card to free up space (they may get moved back during an update). But the 8GB of storage should be adequate for most users
Locked for US carriers. Not sure if this can be unlocked with a code since I won’t be using in the US.
Other than these issues, I find the Moto E quite responsive and a great deal for $30 USD.
Update – Don’t throw out your Sprint SIM card because it can be used with Ringplus (“free” phone service in the US).
Update – Check this post here on how to minimize your data usage.
My budget Huawei Android phone is getting a bit full with apps and has trouble with some updates. I first encountered problems trying to update Google Chrome but was able to get it to work by first uninstalling all updates before reinstalling. I installed a 16GB SD card and set it to default storage but most apps can’t be moved to it.
I bought a combo case/wallet for my phone on ebay and usually minimize what I carry to only my drivers license, credit card and maybe some cash.
On a recent trip to Lowe’s, I didn’t realize they accept air miles and didn’t have the card with me. I found the app Stocard to save loyalty cards to your phone but couldn’t install the app because of insufficient storage error again.
Googling the problem lead to the solution of clearing your app cache. You can install App Cache Cleaner by Apex Apps or you can find a manual solution online.
Update: The App Cleaner isn’t working too well and I will probably need to buy a new phone eventually. Google’s built in apps get bigger with each update and you are not able to uninstall them leaving less room for apps. You can disable them however. Some of the Android versions no longer allow you to move an app to SD card.
When transferring pics from my tablet to my PC, I normally just attach it to an email and retrieve it from the drafts folder on my PC. I had a bunch of photos this time and decided to use USB but when I plugged in my tablet, I got a notification to use wireless transfer.
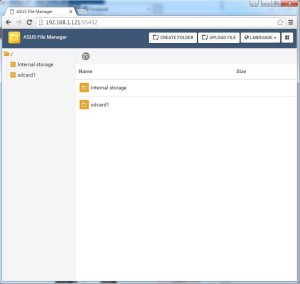
You need Asus File Manager which is available for everyone at the Google Play Store. There is no built in file manager app in Android. To start it, run File Manager on your tablet and scroll until you find PC File Transfer on the bottom. Start the service and it gives you a web address to access your tablet’s file system from a browser. Internet Explorer was not supported so I had to use Chrome.
The files are in a weird order and you can’t click on the Name or Date heading to re-sort it like in an Explorer window.
This does seem to be an easy way to transfer files though tricky to find your files without sort capability.
Update July 25 2016: Internet Explorer seems supported now but clicking on a jpg will open the image in a new tab. If you use Chrome, the image will be saved in your Downloads folder which seems easier if downloading a large number of files.