After some subzero temperatures and heavy rain, I noticed my interior was very humid which lead to finding my rear seats wet and about 2 inches of water in my spare trunk wheel well. Google indicated my tailight gaskets were probably leaking. I vacuumed out about 8L of water. There is a foam pad from the rear seats that goes inside the well which ended up wicking the water up to the seats.
If found a guide here and dug out my service manual on how to remove the bumper. Looked pretty straightforward so I decided to attempt to replace them myself.
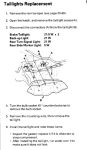
Acuraoemparts wanted $10 USD each and $5 shipping to the US. Part number is 33502-S6M-A11 The dealer charged $21 CAD so I bit the bullet since I needed them changed out before it was going to rain again. I had to phone around to find a dealer that had 2 pieces in stock.
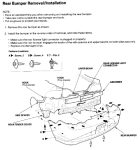
The service manual indicates you should have a helper to remove the bumper but I found that I didn’t need one. The bumper is fairly light and I put a milk crate under the bumper to rest it while detaching the license plate light.
The bumper is held by 3 philips screws on each side by the rear wheels. One is hidden and pointing up. I had one extra screw on each side from the mudflaps. The entire mudflap doesn’t need to be removed, only the two screws attached to the bumper. It was a little difficult to remove these since the tire was in the way. Even a stubby screwdriver was too long so I ended up using the philips stubby bit and a wrench.
There are pop up retaining clips under the bumper. I broke one removing it and the second one was already missing. I am going to order some ebay since they are much cheaper. Part is 91503-SZ3-00
With all the screws and retaining clips removed, the bumper snaps out fairly easily. The license plate light assembly is attached to the bumper with clips so I used a flat blade screw driver to release the clip and free it. I could then set the bumper out of the way.
With the bumper removed you can access the two screws holding each tailight assembly from the bottom. I popped off the center interior panel easily to get better access and unscrewed all the bulbs. Four 8mm nuts held the assembly in place and were put on fairly tight by the factory. I made sure I had them tight when I reassembled.
With the tailight removed, parts of the old gasket remained due to double sided tape in four spots. I scraped all these off to get a good seal with the new gasket.
Putting everything back together was straightforward as well. Make sure you install the bottom tailight screws before putting the bumper back on.
My service manual is for a 2002-2003 RSX though 2004-2006 should be similar.
Update 1: After replacement, I am still getting wet rear seats and a bit of water in the trunk wheel well. I think I have clogged moonroof drains.
Update 2: My mechanic indicated my moonroof drains were not blocked and suspected the weatherstripping around the hatch. I ordered the part#74440-S6M-003 from acurapartswarehouse.com The service manual indicates it is just pushed in so it should be relatively easy to replace. There should be an alignment mark at top center of the weatherstripping.
Update 3: The weatherstrip arrived. Fairly easy to install though a rubber mallet might have helped. It was a bit tricky to get the weatherstrip over the rear hatch panel and the headliner. There is a painted alignment mark on the weatherstrip and the service manual indicated to align it with the center of the hatch. I assumed it meant top center.